
1、Jumpserver简介
Jumpserver 是全球首款完全开源的堡垒机,使用 GNU GPL v2.0 开源协议,是符合4A的专业运维审计系统。其使用 Python / Django 进行开发,遵循 Web 2.0 规范,配备了业界领先的 Web Terminal 解决方案,交互界面美观、用户体验好。并且采纳分布式架构,支持多机房跨区域部署,中心节点提供 API,各机房部署登录节点,可横向扩展、无并发访问限制。
1.1、环境介绍
系统: CentOS 7.4.1708
服务器IP: 192.168.0.111
[root@localhost ~]# uname -r
3.10.0-693.el7.x86_64
[root@localhost ~]# cat /etc/redhat-release
CentOS Linux release 7.4.1708 (Core)
1.2、关闭 selinux 和防火墙
[root@localhost ~]# setenforce 0 #可以设置配置文件永久关闭
[root@localhost ~]# systemctl stop firewalld.service
[root@localhost ~]# systemctl disable firewalld.service
[root@localhost ~]# iptables -F
[root@localhost ~]# iptables-save
1.3、准备Python3和Python3虚拟环境
1)安装依赖包
[root@localhost ~]# yum -y install wget sqlite-devel xz gcc automake zlib-devel openssl-devel epel-release git
2)编译安装Pyhton-3.6.6
[root@localhost ~]# wget https://mirrors.yangxingzhen.com/python/Python-3.6.6.tgz
[root@localhost ~]# tar xf Python-3.6.6.tgz && cd Python-3.6.6
[root@localhost Python-3.6.6]# ./configure
[root@localhost Python-3.6.6]# make && make install
3)建立Python 3虚拟环境
因为 CentOS 6/7 自带的是 Python2,而Yum等工具依赖原来的 Python,为了不扰乱原来的环境我们来使用Python虚拟环境
[root@localhost ~]# cd /opt
[root@localhost opt]# python3 -m venv py3
[root@localhost opt]# source /opt/py3/bin/activate
# 看到下面的提示符代表成功,以后运行 Jumpserver 都要先运行以上 source 命令,以下所有命令均在该虚拟环境中运行
(py3) [root@localhost ~]#
1.4、 安装Jumpserver
1)下载或 Clone 项目
项目提交较多 git clone 时较大,你可以选择去 Github 项目页面直接下载zip包。
(py3) [root@localhost ~]# cd /opt/
(py3) [root@localhost opt]# git clone --depth=1 https://github.com/jumpserver/jumpserver.git && cd jumpserver && git checkout master
#如果下载较慢,配置下hosts文件,请执行以下命令
(py3) [root@localhost opt]# cat >> /etc/hosts <<EOF
192.30.253.113 github.com
151.101.185.194 github.global.ssl.fastly.net
192.30.253.120 codeload.github.com
EOF
#如果还是慢,请执行以下命令
(py3) [root@localhost opt]# wget https://mirrors.yangxingzhen.com/jumpserver/jumpserver.tar.gz
2) 安装依赖RPM包
(py3) [root@localhost opt]# cd /opt/jumpserver/requirements
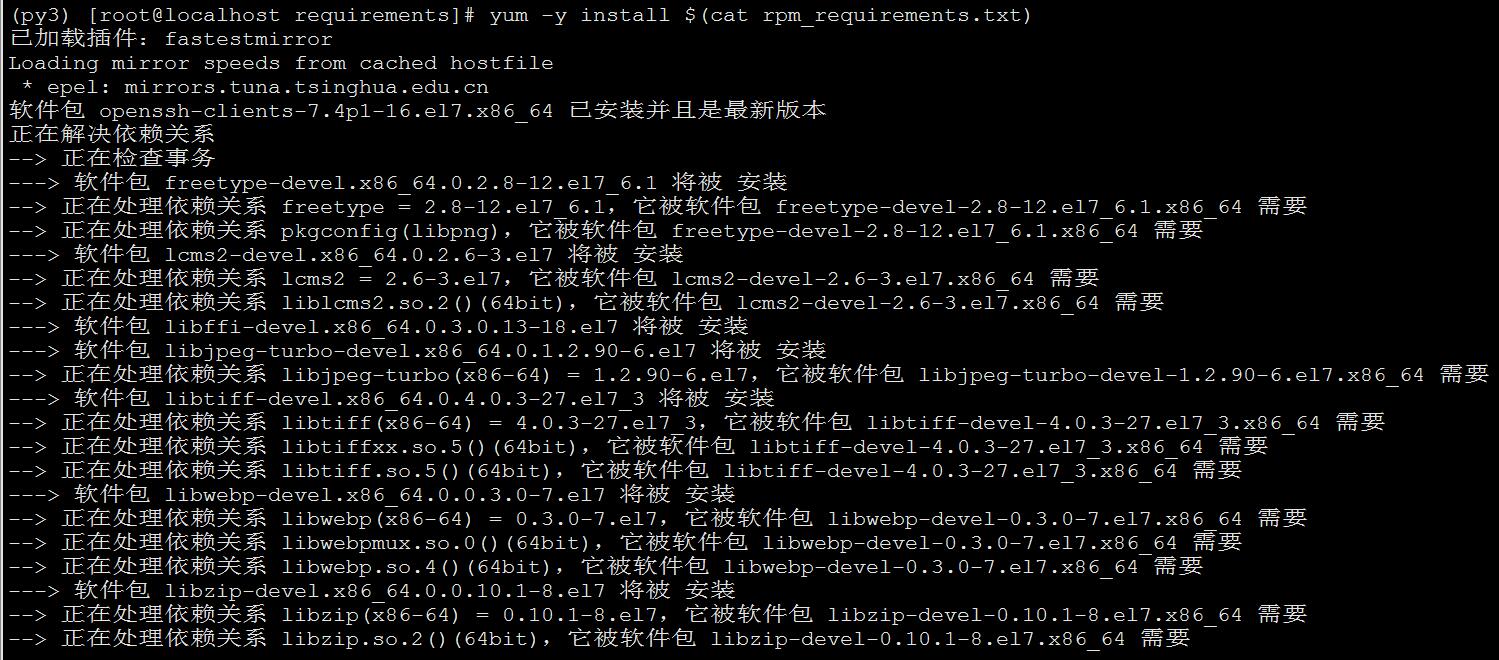
(py3) [root@localhost requirements]# yum -y install $(cat rpm_requirements.txt)
3)安装Python库依赖
(py3) [root@localhost requirements]# pip install --upgrade pip setuptools
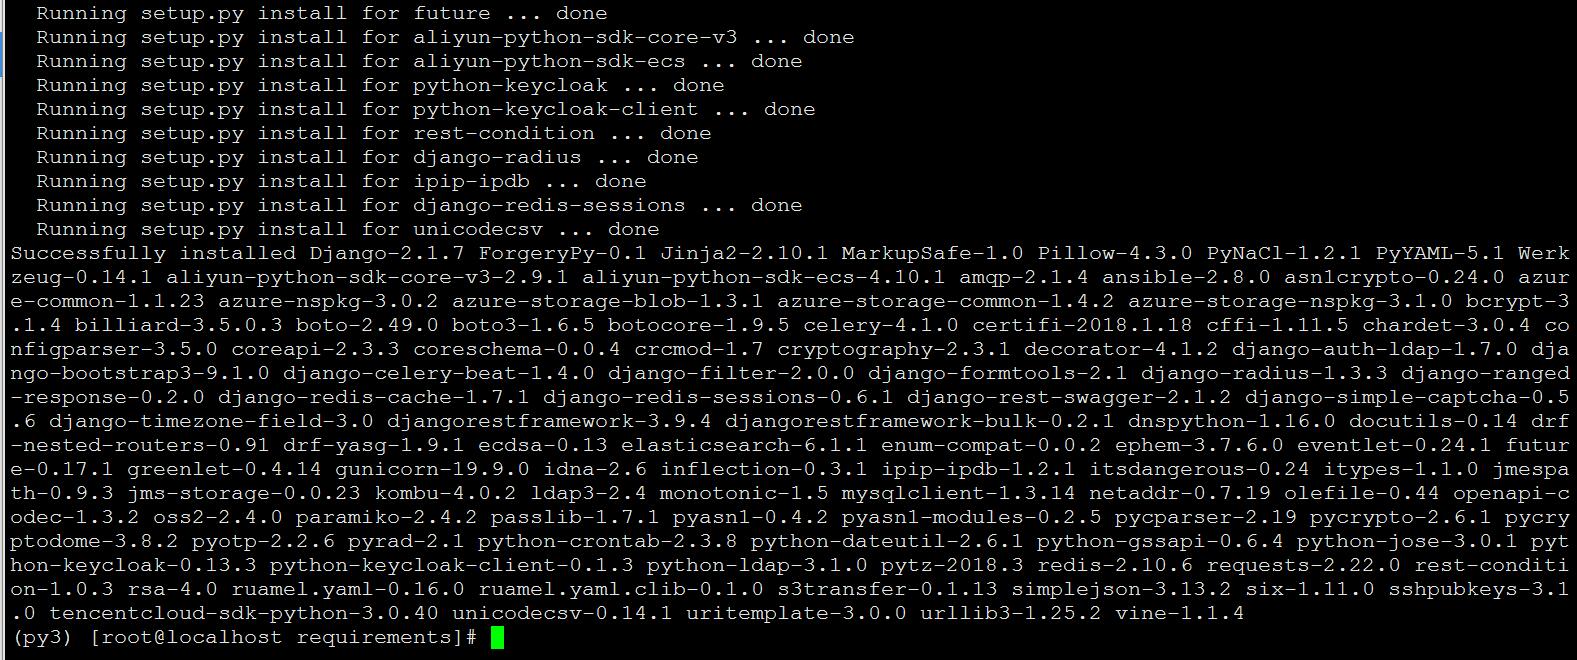
(py3) [root@localhost requirements]# pip install -r requirements.txt
4)安装Redis
(py3) [root@localhost requirements]# wget -c https://mirrors.yangxingzhen.com/redis/redis-3.0.7.tar.gz
(py3) [root@localhost requirements]# tar zxf redis-3.0.7.tar.gz -C /usr/local/
(py3) [root@localhost requirements]# cd /usr/local/redis-3.0.7/
(py3) [root@localhost redis-3.0.7]# make
(py3) [root@localhost redis-3.0.7]# cd src/
(py3) [root@localhost src]# make install
(py3) [root@localhost src]# sed -i '/daemonize/s/no/yes/' /usr/local/redis-3.0.7/redis.conf
(py3) [root@localhost src]# ln -s /usr/local/redis-3.0.7/src/redis-* /usr/bin
(py3) [root@localhost src]# redis-server /usr/local/redis-3.0.7/redis.conf
5)安装Mariadb数据库(经测试由于YUM安装的数据库导致创建资产名称不能输入中文及其他未知Bug,建议源码安装MYSQL,可参照此文章安装数据库:https://www.yangxingzhen.com/351.html)
(py3) [root@localhost src]# yum -y install mariadb mariadb-devel mariadb-server
(py3) [root@localhost src]# systemctl start mariadb
6)创建jumpserver数据库并授权
(py3) [root@localhost src]# mysql
MariaDB [(none)]> create database jumpserver;
MariaDB [(none)]> grant all on jumpserver.* to jumpserver@'127.0.0.1' identified by '123456';
MariaDB [(none)]> flush privileges;
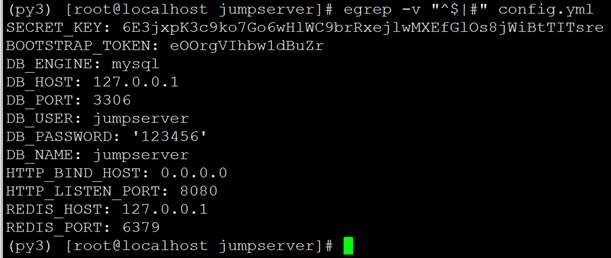
7)修改Jumpserver配置文件
(py3) [root@localhost src]# cd /opt/jumpserver/
(py3) [root@localhost jumpserver]# cp config_example.yml config.yml
(py3) [root@localhost jumpserver]# SECRET_KEY=`cat /dev/urandom | tr -dc A-Za-z0-9 | head -c 50`
(py3) [root@localhost jumpserver]# echo "SECRET_KEY=$SECRET_KEY" >> ~/.bashrc
(py3) [root@localhost jumpserver]# BOOTSTRAP_TOKEN=`cat /dev/urandom | tr -dc A-Za-z0-9 | head -c 16`
(py3) [root@localhost jumpserver]# echo "BOOTSTRAP_TOKEN=$BOOTSTRAP_TOKEN" >> ~/.bashrc
(py3) [root@localhost jumpserver]# sed -i "s/SECRET_KEY:/SECRET_KEY: $SECRET_KEY/g" /opt/jumpserver/config.yml
(py3) [root@localhost jumpserver]# sed -i "s/BOOTSTRAP_TOKEN:/BOOTSTRAP_TOKEN: $BOOTSTRAP_TOKEN/g" /opt/jumpserver/config.yml
(py3) [root@localhost jumpserver]# sed -i "s/# DEBUG: true/DEBUG: false/g" /opt/jumpserver/config.yml
(py3) [root@localhost jumpserver]# sed -i "s/# LOG_LEVEL: DEBUG/LOG_LEVEL: ERROR/g" /opt/jumpserver/config.yml
(py3) [root@localhost jumpserver]# sed -i "s/# SESSION_EXPIRE_AT_BROWSER_CLOSE: false/SESSION_EXPIRE_AT_BROWSER_CLOSE: true/g" /opt/jumpserver/config.yml
(py3) [root@localhost jumpserver]# sed -i "s/DB_PASSWORD: /DB_PASSWORD: \'123456\'/g" /opt/jumpserver/config.yml
(py3) [root@localhost jumpserver]# egrep -v "^$|#" config.yml
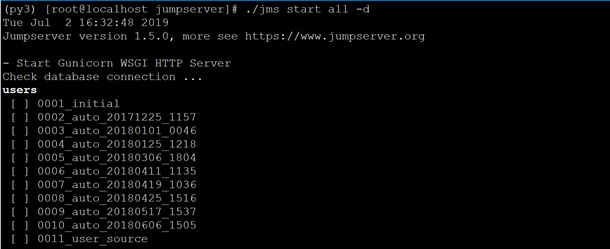
8)运行Jumpserver
(py3) [root@localhost requirements]# cd /opt/jumpserver
#后台运行使用 -d 参数
(py3) [root@localhost jumpserver]# ./jms start all -d
#新版本更新了运行脚本, 使用方式./jms start|stop|status all 后台运行请添加 -d参数
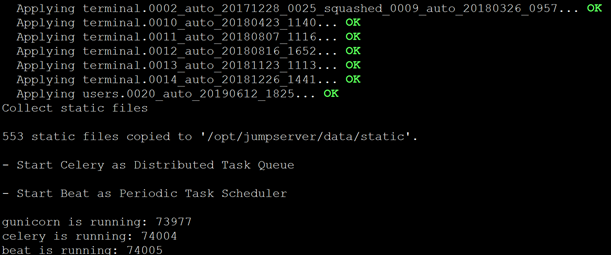
9)浏览器访问
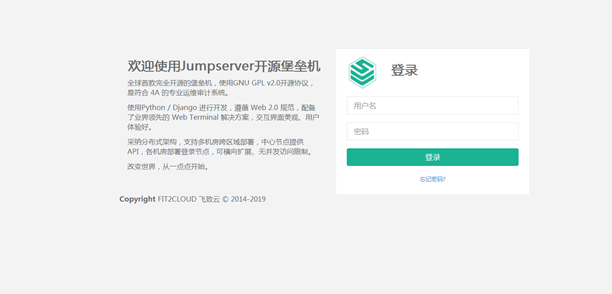
#打开浏览器访问http://192.168.0.111:8080,出现以下界面
账号:admin 密码:admin
1.5、安装 SSH Server 和 WebSocket Server: Coco
1)下载Clone项目
(py3) [root@localhost jumpserver]# cd /opt
(py3) [root@localhost opt]# git clone https://github.com/jumpserver/coco.git && cd coco && git checkout master
2)安装依赖
(py3) [root@localhost coco]# cd requirements
(py3) [root@localhost requirements]# yum -y install $(cat rpm_requirements.txt)
(py3) [root@localhost requirements]# pip install -r requirements.txt
3)查看配置文件并且运行coco
(py3) [root@localhost requirements]# cd /opt/coco
(py3) [root@localhost coco]# cp config_example.yml config.yml
(py3) [root@localhost coco]# TOKEN=`awk '/BOOTSTRAP_TOKEN/ {print $2}' /opt/jumpserver/config.yml`
(py3) [root@localhost coco]# sed -i " s/BOOTSTRAP_TOKEN: .*/BOOTSTRAP_TOKEN: ${TOKEN}/" config.yml
(py3) [root@localhost coco]# nohup ./cocod start &
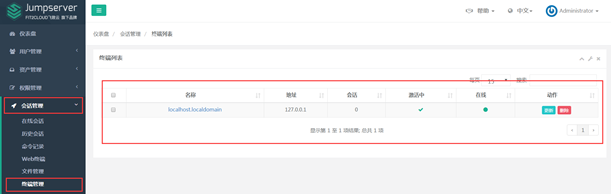
4)登录jumpserver,访问http://192.168.0.111:8080,会话管理->终端管理,如下图
1.6、连接测试
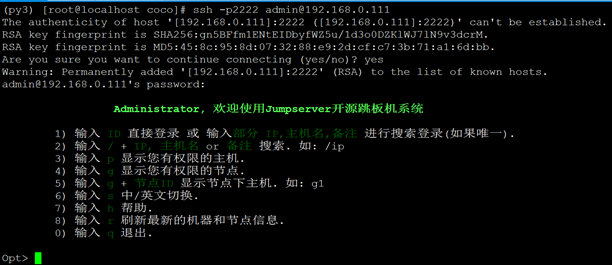
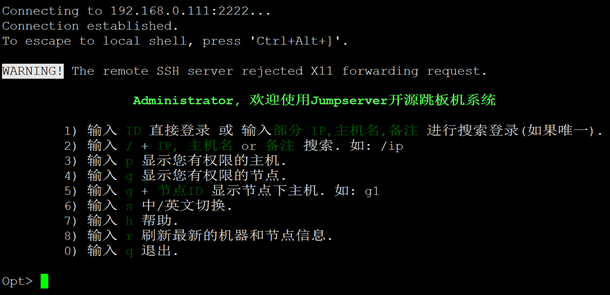
1)终端连接测试(密码:admin)
(py3) [root@localhost coco]# ssh -p2222 admin@192.168.0.111
2)Xshell连接测试(密码:admin)
1.7、安装 Web Terminal 前端: Luna
安装 Web Terminal 前端: Luna 需要 Nginx 来运行访问 访问(https://github.com/jumpserver/luna/releases)下载对应版本的release包, 直接解压, 不需要编译
(py3) [root@localhost coco]# cd /opt
(py3) [root@localhost opt]# wget https://github.com/jumpserver/luna/releases/download/1.5.0/luna.tar.gz
(py3) [root@localhost opt]# tar zxf luna.tar.gz
(py3) [root@localhost opt]# chown -R root:root luna
1.8、配置 Nginx 整合各组件
1)安装Nginx
(py3) [root@localhost opt]# yum -y install nginx
2)修改nginx.conf配置文件,配置内容如下
(py3) [root@localhost ~]# vim /etc/nginx/nginx.conf
	user nginx;
	worker_processes auto;
	error_log /var/log/nginx/error.log;
	pid /run/nginx.pid;
	include /usr/share/nginx/modules/*.conf;
	events {
	worker_connections 1024;
	}
http    {
	log_format main '$remote_addr - $remote_user [$time_local] "$request" '
			'$status $body_bytes_sent "$http_referer" '
			'"$http_user_agent" "$http_x_forwarded_for"';
	access_log /var/log/nginx/access.log main;
	sendfile on;
	tcp_nopush on;
	tcp_nodelay on;
	keepalive_timeout 65;
	types_hash_max_size 2048;
	include /etc/nginx/mime.types;
	default_type application/octet-stream;
	include /etc/nginx/conf.d/*.conf;
server	{
	listen 80;
	server_name localhost;
	client_max_body_size 100m; # 录像及文件上传大小限制
	location /luna/ {
	try_files $uri / /index.html;
	alias /opt/luna/; # luna 路径, 如果修改安装目录, 此处需要修改
	}
	location /media/ {
	add_header Content-Encoding gzip;
	root /opt/jumpserver/data/; # 录像位置, 如果修改安装目录, 此处需要修改
	}
	location /static/ {
	root /opt/jumpserver/data/; # 静态资源, 如果修改安装目录, 此处需要修改
	}
	location /socket.io/ {
	proxy_pass http://localhost:5000/socket.io/;
	proxy_buffering off;
	proxy_http_version 1.1;
	proxy_set_header Upgrade $http_upgrade;
	proxy_set_header Connection "upgrade";
	proxy_set_header X-Real-IP $remote_addr;
	proxy_set_header Host $host;
	proxy_set_header X-Forwarded-For $proxy_add_x_forwarded_for;
	access_log off;
	}
	location /coco/ {
	proxy_pass http://localhost:5000/coco/;
	proxy_set_header X-Real-IP $remote_addr;
	proxy_set_header Host $host;
	proxy_set_header X-Forwarded-For $proxy_add_x_forwarded_for;
	access_log off;
	}
	location / {
	proxy_pass http://localhost:8080;
	proxy_set_header X-Real-IP $remote_addr;
	proxy_set_header Host $host;
	proxy_set_header X-Forwarded-For $proxy_add_x_forwarded_for;
	}
    }
}
3)启动Nginx服务
(py3) [root@localhost ~]# nginx -t
nginx: the configuration file /etc/nginx/nginx.conf syntax is ok
nginx: configuration file /etc/nginx/nginx.conf test is successful
(py3) [root@localhost ~]# nginx
4、访问Jumpserver,如下图
#浏览器输入http://192.168.0.111

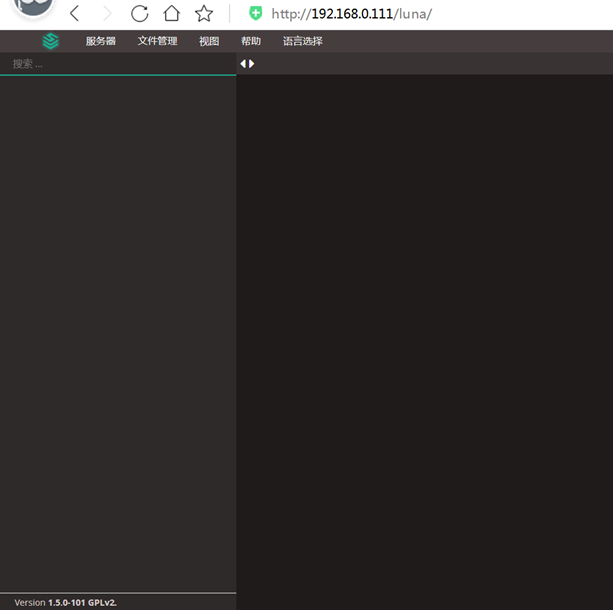
5、访问luna,如下图
若文章图片、下载链接等信息出错,请在评论区留言反馈,博主将第一时间更新!如本文“对您有用”,欢迎随意打赏,谢谢!


优秀
写的不错
本人亲测,无坑
@ 小柒博客 有坑,要填坑
@ xxx 有啥坑??请明示