
此脚本是Linux一键部署ELK+Filebeat+Nginx+Redis日志平台自动化脚本,有需要朋友可以参考,脚本内容如下:
环境准备
操作系统:CentOS Linux release 7.8.2003
软件版本
Elasticsearch:elasticsearch-7.5.1-linux-x86_64.tar.gz
Kibana:kibana-7.5.1-linux-x86_64.tar.gz
Logstash:logstash-7.5.1.tar.gz
Filebeat:filebeat-7.5.1-linux-x86_64.tar.gz
JDK:jdk-11.0.1_linux-x64_bin.tar.gz
Nginx:nginx-1.18.0.tar.gz
Redis:redis-5.0.7.tar.gz
脚本功能
1)一键安装Elasticsearch、Kibana、Logstash、Filebeat
2)一键安装Redis
3)一键安装Nginx
4)自动添加nginx_access、nginx_error索引
5)自动配置Elasticsearch用户密码
[root@localhost ~]# vim install_elk_filebeat_redis.sh
#!/bin/bash
#Date:2019-5-20 13:14:00
#Author Blog:
#    https://www.yangxingzhen.com
#    https://www.yangxingzhen.cn
#Author WeChat:
#    微信公众号:小柒博客
#Author mirrors site:
#    https://mirrors.yangxingzhen.com
#About the Author
#    BY:YangXingZhen
#    Mail:xingzhen.yang@yangxingzhen.com
#    QQ:675583110
#Auto Install ELK log analysis platform

User="elk"
Elasticsearch_User="elastic"
Elasticsearch_Passwd="www.yangxingzhen.com"
IPADDR=$(hostname -I |awk '{print $1}')
Elasticsearch_DIR="/data/elasticsearch"
Kafka_IP=$(hostname -I |awk '{print $1}')
Zookeeper_IP=$(hostname -I |awk '{print $1}')
Elasticsearch_IP=$(hostname -I |awk '{print $1}')

# Define JDK path variables
JDK_URL=https://mirrors.yangxingzhen.com/jdk
JDK_File=jdk-11.0.1_linux-x64_bin.tar.gz
JDK_File_Dir=jdk-11.0.1
JDK_Dir=/usr/local/jdk-11.0.1

# Define Redis path variables
Redis_URL=http://download.redis.io/releases
Redis_File=redis-5.0.7.tar.gz
Redis_File_Dir=redis-5.0.7
Redis_Prefix=/usr/local/redis

# Define Nginx path variables
Nginx_URL=http://nginx.org/download
Nginx_File=nginx-1.18.0.tar.gz
Nginx_File_Dir=nginx-1.18.0
Nginx_Dir=/usr/local/nginx

# Define Elasticsearch path variables
Elasticsearch_URL=https://artifacts.elastic.co/downloads/elasticsearch
Elasticsearch_File=elasticsearch-7.5.1-linux-x86_64.tar.gz
Elasticsearch_File_Dir=elasticsearch-7.5.1
Elasticsearch_Dir=/usr/local/elasticsearch

# Define Logstash path variables
Filebeat_URL=https://artifacts.elastic.co/downloads/beats/filebeat
Filebeat_File=filebeat-7.5.1-linux-x86_64.tar.gz
Filebeat_File_Dir=filebeat-7.5.1-linux-x86_64
Filebeat_Dir=/usr/local/filebeat

# Define Kafka path variables
Logstash_URL=https://artifacts.elastic.co/downloads/logstash
Logstash_File=logstash-7.5.1.tar.gz
Logstash_File_Dir=logstash-7.5.1
Logstash_Dir=/usr/local/logstash

# Define Kibana path variables
Kibana_URL=https://artifacts.elastic.co/downloads/kibana
Kibana_File=kibana-7.5.1-linux-x86_64.tar.gz
Kibana_File_Dir=kibana-7.5.1-linux-x86_64
Kibana_Dir=/usr/local/kibana

# 配置内核参数
cat >>/etc/security/limits.conf <<EOF
* soft nofile 65537
* hard nofile 65537
* soft nproc 65537
* hard nproc 65537
EOF

if [ $(grep -wc "4096" /etc/security/limits.d/20-nproc.conf) -eq 0 ];then
cat >>/etc/security/limits.d/20-nproc.conf <<EOF
*          soft    nproc     4096
EOF
fi

cat >/etc/sysctl.conf <<EOF
net.ipv4.tcp_max_syn_backlog = 65536
net.core.netdev_max_backlog = 32768
net.core.somaxconn = 32768
net.core.wmem_default = 8388608
net.core.rmem_default = 8388608
net.core.rmem_max = 16777216
net.core.wmem_max = 16777216
net.ipv4.tcp_timestamps = 0
net.ipv4.tcp_synack_retries = 2
net.ipv4.tcp_syn_retries = 2
net.ipv4.tcp_tw_recycle = 1
net.ipv4.tcp_tw_reuse = 1
net.ipv4.tcp_mem = 94500000 915000000 927000000
net.ipv4.tcp_max_orphans = 3276800
net.ipv4.tcp_fin_timeout = 120
net.ipv4.tcp_keepalive_time = 120
net.ipv4.ip_local_port_range = 1024 65535
net.ipv4.tcp_max_tw_buckets = 30000
fs.file-max=655350
vm.max_map_count = 262144
net.core.somaxconn= 65535
net.ipv4.ip_forward = 1
net.ipv6.conf.all.disable_ipv6=1
EOF

# sysctl -p使其配置生效
sysctl -p >/dev/null

# 创建elk用户
[ $(grep -wc "elk" /etc/passwd) -eq 0 ] && useradd elk >/dev/null

# 安装JDK环境
java -version >/dev/null 2>&1
if [ $? -ne 0 ];then
	# Install Package
	[ -f /usr/bin/wget ] || yum -y install wget >/dev/null
	wget -c ${JDK_URL}/${JDK_File}
	tar xf ${JDK_File}
	mv ${JDK_File_Dir} ${JDK_Dir}
cat >>/etc/profile <<EOF
export JAVA_HOME=${JDK_Dir}
export CLASSPATH=\$CLASSPATH:\$JAVA_HOME/lib:\$JAVA_HOME/jre/lib
export PATH=\$JAVA_HOME/bin:\$JAVA_HOME/jre/bin:\$PATH:\$HOMR/bin
EOF
fi

# 加载环境变量
source /etc/profile >/dev/null

# Install Redis
if [ ! -d ${Redis_Prefix} ];then
	[ -f /usr/bin/openssl ] || yum -y install openssl openssl-devel
	yum -y install wget gcc gcc-c++
	wget -c ${Redis_URL}/${Redis_File}
	tar zxf ${Redis_File}
	\mv ${Redis_File_Dir} ${Redis_Prefix}
	cd ${Redis_Prefix} && make
	if [ $? -eq 0 ];then
		echo -e "\033[32mThe Redis Install Success...\033[0m"
	else
		echo -e "\033[31mThe Redis Install Failed...\033[0m"
	fi
else
	echo -e "\033[31mThe Redis has been installed...\033[0m"
	exit 1
fi

# 随机生成密码
Passwd=$(openssl rand -hex 12)

# Config Redis
ln -sf ${Redis_Prefix}/src/redis-* /usr/bin
sed -i "s/127.0.0.1/0.0.0.0/g" ${Redis_Prefix}/redis.conf
sed -i "/daemonize/s/no/yes/" ${Redis_Prefix}/redis.conf
sed -i "s/dir .*/dir \/data\/redis/" ${Redis_Prefix}/redis.conf
sed -i "s/logfile .*/logfile \/usr\/local\/redis\/redis.log/" ${Redis_Prefix}/redis.conf
sed -i '/appendonly/s/no/yes/' ${Redis_Prefix}/redis.conf
sed -i "s/# requirepass foobared/requirepass ${Passwd}/" ${Redis_Prefix}/redis.conf
echo never > /sys/kernel/mm/transparent_hugepage/enabled
sysctl vm.overcommit_memory=1

# Create data directory
[ -d /data/redis ] || mkdir -p /data/redis

# 创建systemctl管理配置文件
cat >/usr/lib/systemd/system/redis.service <<EOF
[Unit]
Description=Redis Server
After=network-online.target remote-fs.target nss-lookup.target
Wants=network-online.target

[Service]
Type=forking
ExecStart=/usr/bin/redis-server ${Redis_Prefix}/redis.conf
ExecStop=/usr/bin/redis-cli -h 127.0.0.1 -p 6379 shutdown
User=root
Group=root

[Install]
WantedBy=multi-user.target
EOF

# Add power on self start And Start Redis
systemctl daemon-reload
systemctl enable redis
systemctl start redis

# Install Elasticsearch
if [ ! -d ${Elasticsearch_Dir} ];then
	# Install Package
	[ -f /usr/bin/wget ] || yum -y install wget >/dev/null
	cd ~ && wget -c ${Elasticsearch_URL}/${Elasticsearch_File}
	tar xf ${Elasticsearch_File}
	mv ${Elasticsearch_File_Dir} ${Elasticsearch_Dir}
else
	echo -e "\033[31mThe Elasticsearch Already Install...\033[0m"
	exit 1
fi

# Install Kibana
if [ ! -d ${Kibana_Dir} ];then
	# Install Package
	[ -f /usr/bin/wget ] || yum -y install wget >/dev/null
	cd ~ && wget -c ${Kibana_URL}/${Kibana_File}
	tar xf ${Kibana_File}
	mv ${Kibana_File_Dir} ${Kibana_Dir}
else
	echo -e "\033[31mThe Kibana Already Install...\033[0m"
	exit 1
fi

# 配置Elasticsearch
mkdir -p ${Elasticsearch_DIR}/{data,logs}
cat >${Elasticsearch_Dir}/config/elasticsearch.yml <<EOF
# 节点名称
node.name: es-master
# 存放数据目录,先创建该目录
path.data: ${Elasticsearch_DIR}/data
# 存放日志目录,先创建该目录
path.logs: ${Elasticsearch_DIR}/logs
# 节点IP
network.host: ${Elasticsearch_IP}
# tcp端口
transport.tcp.port: 9300
# http端口
http.port: 9200
# 主合格节点列表,若有多个主节点,则主节点进行对应的配置
cluster.initial_master_nodes: ["${Elasticsearch_IP}:9300"]
# 是否允许作为主节点
node.master: true
# 是否保存数据
node.data: true
node.ingest: false
node.ml: false
cluster.remote.connect: false
# 跨域
http.cors.enabled: true
http.cors.allow-origin: "*"
# 配置X-Pack
http.cors.allow-headers: Authorization
xpack.security.enabled: true
xpack.security.transport.ssl.enabled: true
EOF

# 配置Kibana
cat >${Kibana_Dir}/config/kibana.yml <<EOF
server.port: 5601
server.host: "${Elasticsearch_IP}"
elasticsearch.hosts: ["http://${Elasticsearch_IP}:9200"]
elasticsearch.username: "${Elasticsearch_User}"
elasticsearch.password: "${Elasticsearch_Passwd}"
logging.dest: ${Kibana_Dir}/logs/kibana.log
i18n.locale: "zh-CN"
EOF

# 创建Kibana日志目录
[ -d ${Kibana_Dir}/logs ] || mkdir ${Kibana_Dir}/logs

# 授权ELK用户管理Elasticsearch、Kibana
chown -R ${User}.${User} ${Elasticsearch_Dir}
chown -R ${User}.${User} ${Elasticsearch_DIR}
chown -R root.root ${Kibana_Dir}

# 启动Elasticsearch
#su ${User} -c "source /etc/profile >/dev/null && ${Elasticsearch_Dir}/bin/elasticsearch -d"

# 创建systemctl管理配置文件
cat >/usr/lib/systemd/system/elasticsearch.service <<EOF
[Unit]
Description=elasticsearch
After=network-online.target remote-fs.target nss-lookup.target
Wants=network-online.target

[Service]
LimitCORE=infinity
LimitNOFILE=655360
LimitNPROC=655360
User=${User}
Group=${User}
PIDFile=${Elasticsearch_Dir}/logs/elasticsearch.pid
ExecStart=${Elasticsearch_Dir}/bin/elasticsearch
ExecReload=/bin/kill -s HUP $MAINPID
ExecStop=/bin/kill -s TERM $MAINPID
RestartSec=30
Restart=always
PrivateTmp=true

[Install]
WantedBy=multi-user.target
EOF

# 启动Elasticsearch服务
systemctl daemon-reload
systemctl enable elasticsearch
systemctl start elasticsearch

# 判断Elasticsearch服务是否启动,启动成功才执行以下操作
Code=""
while sleep 10
do
	echo -e "\033[32m$(date +'%F %T') 等待Elasticsearch服务启动...\033[0m"
	# 获取Elasticsearch服务端口
	netstat -lntup |egrep "9200|9300" >/dev/null
	if [ $? -eq 0 ];then
		Code="break"
	fi
${Code}
done

# 生成Elasticsearch密码
cat >/tmp/config_elasticsearch_passwd.exp <<EOF
spawn su ${User} -c "source /etc/profile >/dev/null && ${Elasticsearch_Dir}/bin/elasticsearch-setup-passwords interactive"
set timeout 60
expect {
        -timeout 20
        "y/N" {
                send "y\n"
                exp_continue
                }
        "Enter password *:" {
                send "${Elasticsearch_Passwd}\n"
                exp_continue
                }
        "Reenter password *:" {
                send "${Elasticsearch_Passwd}\n"
                exp_continue
                }
        "Enter password *:" {
                send "${Elasticsearch_Passwd}\n"
                exp_continue
                }
        "Reenter password *:" {
                send "${Elasticsearch_Passwd}\n"
                exp_continue
                }
        "Enter password *:" {
                send "${Elasticsearch_Passwd}\n"
                exp_continue
                }
        "Reenter password *:" {
                send "${Elasticsearch_Passwd}\n"
                exp_continue
                }
        "Enter password *:" {
                send "${Elasticsearch_Passwd}\n"
                exp_continue
                }
        "Reenter password *:" {
                send "${Elasticsearch_Passwd}\n"
                exp_continue
                }
        "Enter password *:" {
                send "${Elasticsearch_Passwd}\n"
                exp_continue
                }
        "Reenter password *:" {
                send "${Elasticsearch_Passwd}\n"
                exp_continue
                }
        "Enter password *:" {
                send "${Elasticsearch_Passwd}\n"
                exp_continue
                }
        "Reenter password *:" {
                send "${Elasticsearch_Passwd}\n"
                exp_continue
                }
}
EOF

[ -f /usr/bin/expect ] || yum -y install expect >/dev/null
expect /tmp/config_elasticsearch_passwd.exp

# 创建systemctl管理配置文件
cat >/usr/lib/systemd/system/kibana.service <<EOF
[Unit]
Description=kibana
After=network-online.target remote-fs.target nss-lookup.target
Wants=network-online.target

[Service]
PIDFile=/var/run/kibana.pid
ExecStart=/usr/local/kibana/bin/kibana --allow-root
ExecReload=/bin/kill -s HUP $MAINPID
ExecStop=/bin/kill -s TERM $MAINPID
PrivateTmp=false

[Install]
WantedBy=multi-user.target
EOF

# 启动Kibana
systemctl daemon-reload
systemctl enable kibana
systemctl start kibana

# 判断Kibana服务是否启动,启动成功才执行以下操作
Code=""
while sleep 10
do
	echo -e "\033[32m$(date +'%F %T') 等待Kibana服务启动...\033[0m"
	# 获取Kibana服务端口
	CODE=$(curl -s -w "%{http_code}" -o /dev/null http://${IPADDR}:5601/login)
	if [ ${CODE} -eq 200 ];then
		Code="break"
	fi
${Code}
done

# Install Filebeat
if [ ! -d ${Filebeat_Dir} ];then
	cd ~ && wget -c ${Filebeat_URL}/${Filebeat_File}
	tar xf ${Filebeat_File}
	mv ${Filebeat_File_Dir} ${Filebeat_Dir}
else
	echo -e "\033[31mThe Filebeat Already Install...\033[0m"
	exit 1
fi

# Install Logstash
if [ ! -d ${Logstash_Dir} ];then
	cd ~ && wget -c ${Logstash_URL}/${Logstash_File}
	tar xf ${Logstash_File}
	mv ${Logstash_File_Dir} ${Logstash_Dir}
else
	echo -e "\033[31mThe Logstash Already Install...\033[0m"
	exit 1
fi

# Install Nginx Soft
if [ ! -d ${Nginx_Dir} ];then
	# Install Package
	yum -y install pcre pcre-devel openssl openssl-devel gcc gcc-c++
	cd ~ && wget -c ${Nginx_URL}/${Nginx_File}
	tar zxf ${Nginx_File}
	cd ${Nginx_File_Dir}
	sed -i 's/1.18.0/ /;s/nginx\//nginx/' src/core/nginx.h
	useradd -s /sbin/nologin www
	./configure --prefix=${Nginx_Dir} \
	--user=www \
	--group=www \
	--with-http_ssl_module \
	--with-http_stub_status_module \
	--with-stream
	if [ $? -eq 0 ];then
		make -j$(nproc) && make install
		echo -e "\033[32mThe Nginx Install Success...\033[0m"
	else
		echo -e "\033[31mThe Nginx Install Failed...\033[0m"
		exit 1
	fi
else
	echo -e "\033[31mThe Nginx already Install...\033[0m"
	exit 1
fi

#Config Nginx
ln -sf ${Nginx_Dir}/sbin/nginx /usr/sbin
cat >${Nginx_Dir}/conf/nginx.conf <<EOF
	user www www;
	worker_processes auto;
	pid /usr/local/nginx/logs/nginx.pid;
events {
	use epoll;
	worker_connections 10240;
	multi_accept on;
	}
http	{
	include       mime.types;
	default_type  application/octet-stream;
	log_format json '{"@timestamp":"\$time_iso8601",'
			'"host":"\$server_addr",'
			'"clientip":"\$remote_addr",'
			'"remote_user":"\$remote_user",'
			'"request":"\$request",'
			'"http_user_agent":"\$http_user_agent",'
			'"size":\$body_bytes_sent,'
			'"responsetime":\$request_time,'
			'"upstreamtime":"\$upstream_response_time",'
			'"upstreamhost":"\$upstream_addr",'
			'"http_host":"\$host",'
			'"requesturi":"\$request_uri",'
			'"url":"\$uri",'
			'"domain":"\$host",'
			'"xff":"\$http_x_forwarded_for",'
			'"referer":"\$http_referer",'
			'"status":"\$status"}';
	access_log logs/access.log json;
	error_log logs/error.log warn;
	sendfile        on;
	tcp_nopush          on;
	keepalive_timeout  120;
	tcp_nodelay         on;
	server_tokens off;
	gzip    on;
	gzip_min_length 1k;
	gzip_buffers    4 64k;
	gzip_http_version 1.1;
	gzip_comp_level 4;
	gzip_types      text/plain application/x-javascript text/css application/xml;
	gzip_vary       on;
	client_max_body_size 10m;
	client_body_buffer_size 128k;
	proxy_connect_timeout 90;
	proxy_send_timeout 90;
	proxy_buffer_size 4k;
	proxy_buffers 4 32k;
	proxy_busy_buffers_size 64k;
	large_client_header_buffers 4 4k;
	client_header_buffer_size 4k;
	open_file_cache_valid 30s;
	open_file_cache_min_uses 1;
server {
	listen	80;
	server_name	localhost;
	location / {
	proxy_pass   http://${IPADDR}:5601;
	proxy_set_header   Host             \$host;
	proxy_set_header   X-Real-IP        \$remote_addr;
	proxy_set_header   X-Forwarded-For  \$proxy_add_x_forwarded_for;
	}
  }
}
EOF

# 创建systemctl管理配置文件
cat >/usr/lib/systemd/system/nginx.service <<EOF
[Unit]
Description=Nginx Server
Documentation=http://nginx.org/en/docs/
After=network-online.target remote-fs.target nss-lookup.target
Wants=network-online.target

[Service]
Type=forking
PIDFile=${Nginx_Dir}/logs/nginx.pid
ExecStart=${Nginx_Dir}/sbin/nginx -c ${Nginx_Dir}/conf/nginx.conf
ExecReload=/bin/kill -s HUP $MAINPID
ExecStop=/bin/kill -s TERM $MAINPID

[Install]
WantedBy=multi-user.target
EOF

# Start Nginx
systemctl daemon-reload
systemctl enable nginx
systemctl start nginx

# 配置Filebeat
cat >${Filebeat_Dir}/filebeat.yml <<EOF
filebeat.inputs:
- type: log
  enabled: true
  paths:
    - ${Nginx_Dir}/logs/access.log
  multiline:
      pattern: '^\d{4}-\d{1,2}-\d{1,2}\s\d{1,2}:\d{1,2}:\d{1,2}'
      negate: true
      match: after
  fields:
    logtype: nginx_access
- type: log
  enabled: true
  paths:
    - ${Nginx_Dir}/logs/error.log
  multiline:
      pattern: '^\d{4}-\d{1,2}-\d{1,2}\s\d{1,2}:\d{1,2}:\d{1,2}'
      negate: true
      match: after
  fields:
    logtype: nginx_error
output.redis:
  enabled: true
  hosts: ["${IPADDR}:6379"]
  password: "${Passwd}"
  key: "all-access-log"
  db: 0
  timeout: 10
EOF

# 配置Logstash
cat >${Logstash_Dir}/config/nginx.conf <<EOF
input {
    redis {
        host => "${IPADDR}"
        port => "6379"
        db => "0"
        password => "${Passwd}"
        data_type => "list"
        key => "all-access-log"
        codec => "json"
    }
}

filter {
    if [fields][logtype] == "nginx_access" {
        json {
            source => "message"
        }

        grok {
            match => { "message" => "%{TIMESTAMP_ISO8601:timestamp} %{LOGLEVEL:level}" }
        }

        date {
            match => ["timestamp", "yyyy-MM-dd HH:mm:ss,SSS"]
            target => "@timestamp"
        }
    }
	if [fields][logtype] == "nginx_error" {
        json {
            source => "message"
        }

        grok {
            match => { "message" => "%{TIMESTAMP_ISO8601:timestamp} %{LOGLEVEL:level}" }
        }

        date {
            match => ["timestamp", "yyyy-MM-dd HH:mm:ss,SSS"]
            target => "@timestamp"
        }
    }
}

output {
    if [fields][logtype] == "nginx_access" {
        elasticsearch {
            hosts => ["${Elasticsearch_IP}:9200"]
            user => "${Elasticsearch_User}"
            password => "${Elasticsearch_Passwd}"
            action => "index"
            index => "nginx_access.log-%{+YYYY.MM.dd}"
        }
    }
    if [fields][logtype] == "nginx_error" {
        elasticsearch {
            hosts => ["${Elasticsearch_IP}:9200"]
            user => "${Elasticsearch_User}"
            password => "${Elasticsearch_Passwd}"
            action => "index"
            index => "nginx_error.log-%{+YYYY.MM.dd}"
        }
    }
}
EOF

# 创建Filebeat日志目录
[ -d ${Filebeat_Dir}/logs ] || mkdir ${Filebeat_Dir}/logs

# 授权ELK用户管理Filebeat、Logstash
chown -R ${User}.${User} ${Filebeat_Dir}
chown -R ${User}.${User} ${Logstash_Dir}

# 启动Filebeat
su ${User} -c "cd ${Filebeat_Dir} && nohup ./filebeat -e -c filebeat.yml >>${Filebeat_Dir}/logs/filebeat.log >/dev/null 2>&1 &"

# 启动Logstash
su ${User} -c "cd ${Logstash_Dir}/bin && nohup ./logstash -f ${Logstash_Dir}/config/nginx.conf >/dev/null 2>&1 &"

# 判断Logstash服务是否启动,启动成功才执行以下操作
Code=""
while sleep 10
do
	echo -e "\033[32m$(date +'%F %T') 等待Logstash服务启动...\033[0m"
	# 获取Logstash服务端口
	netstat -lntup |grep "9600" >/dev/null
	if [ $? -eq 0 ];then
		Code="break"
	fi
${Code}
done

echo -e "\033[32mELK日志分析平台搭建完毕... \n通过浏览器访问:http://${IPADDR}\n用户名:${Elasticsearch_User}\n密码:${Elasticsearch_Passwd}\033[0m"
脚本执行方式:
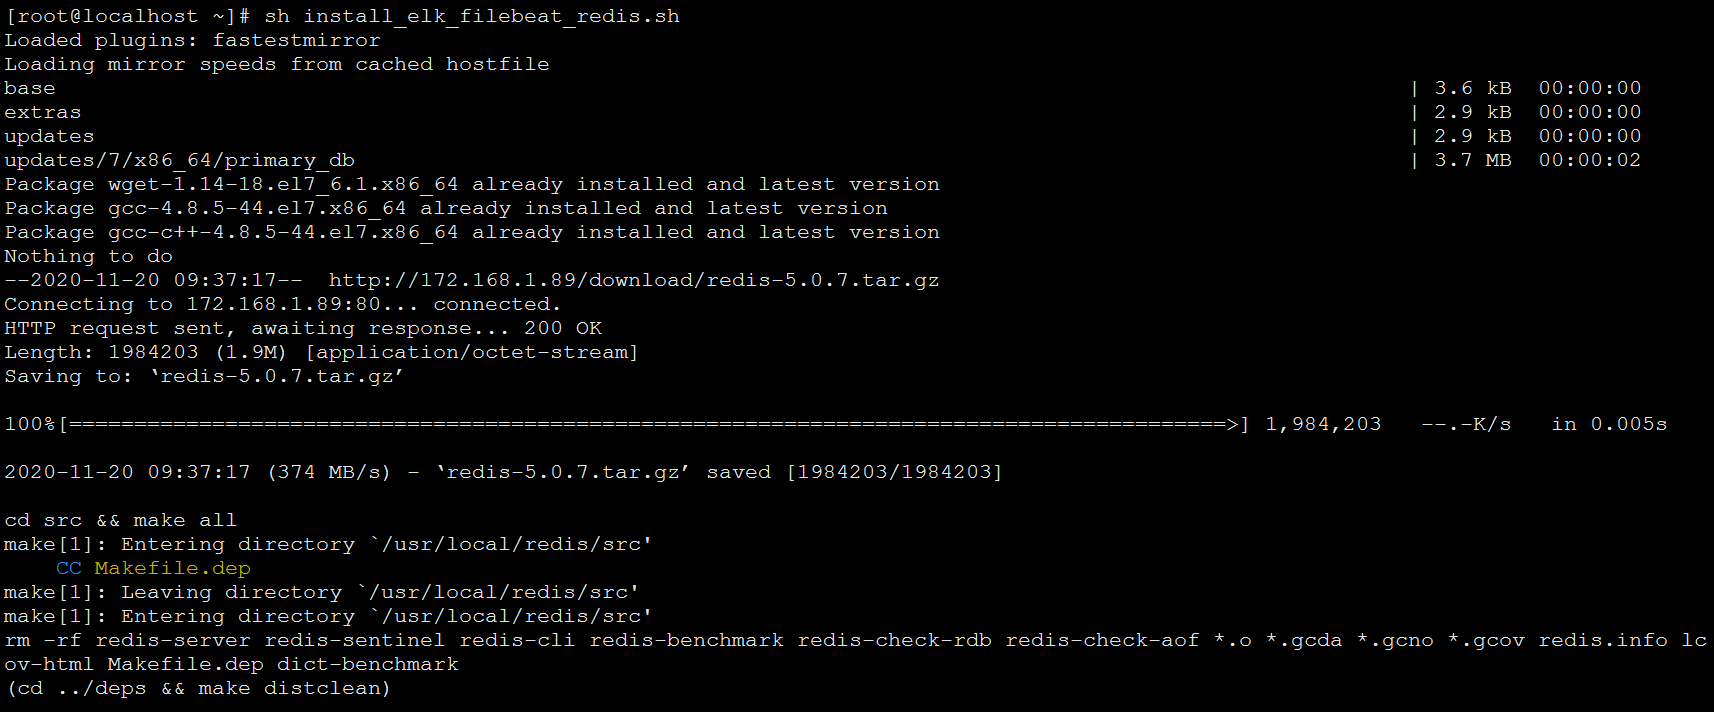
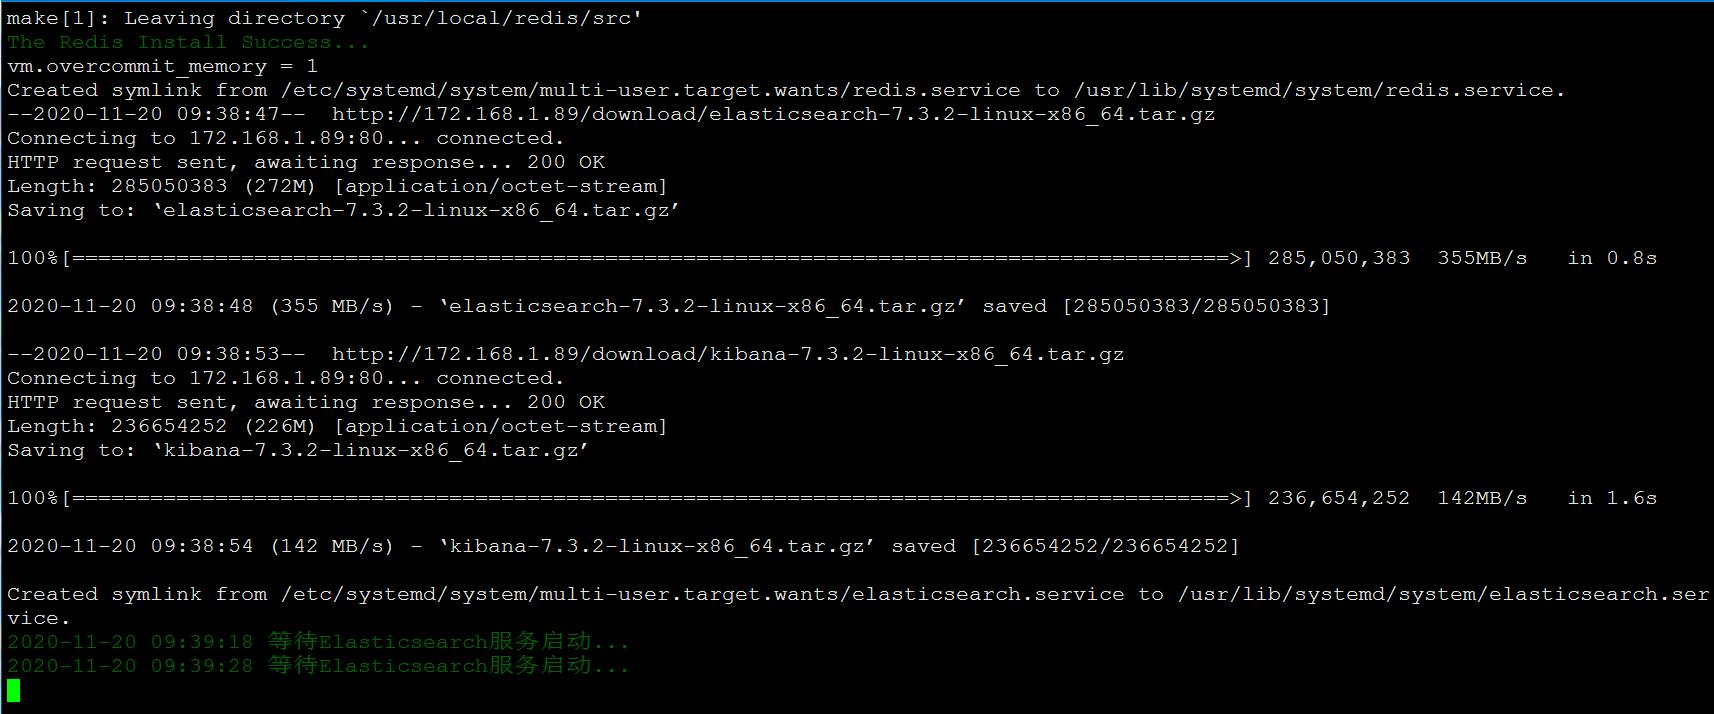
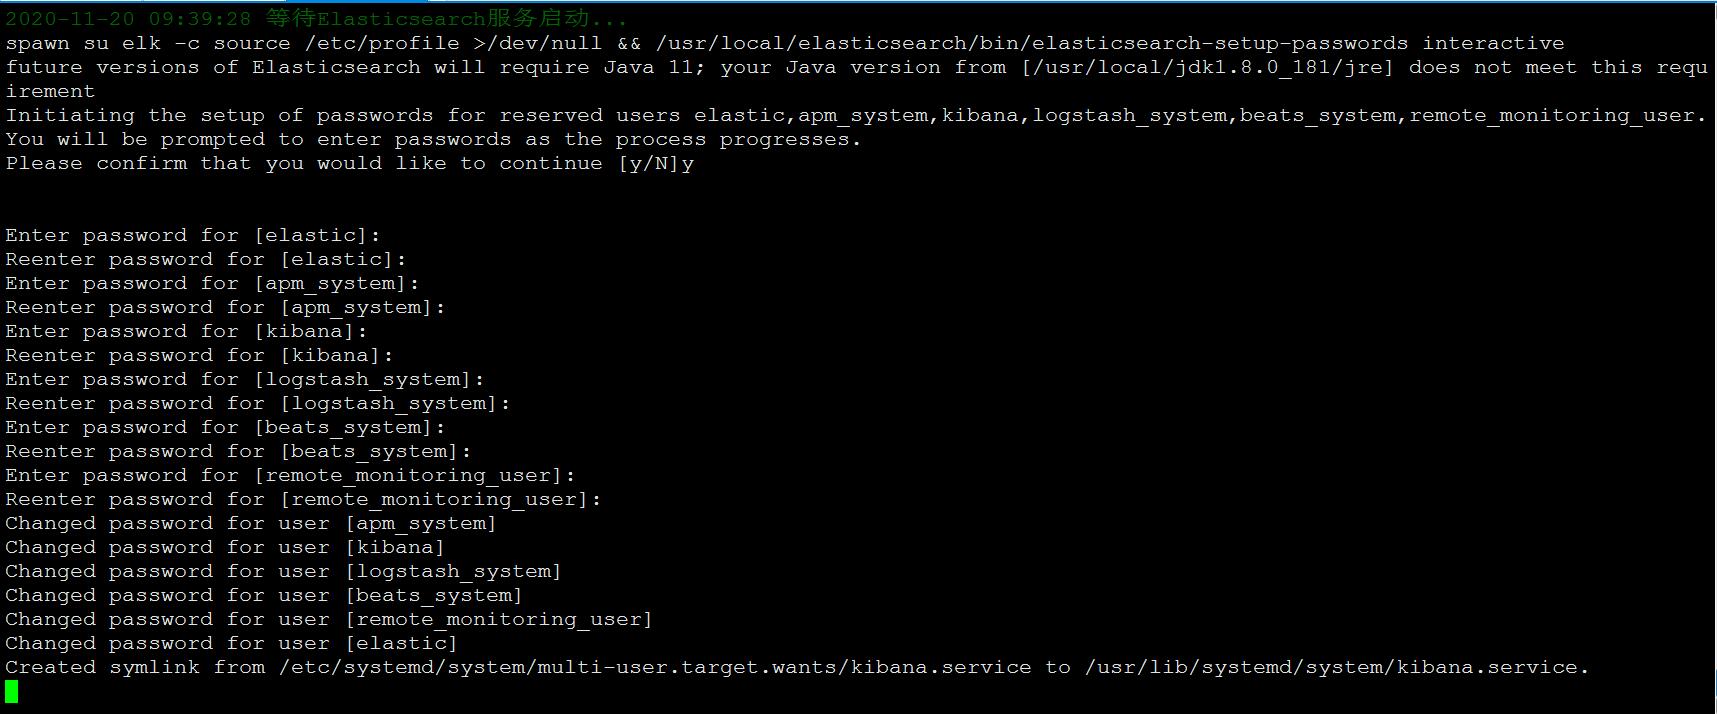
[root@localhost ~]# sh install_elk_filebeat_redis.sh
脚本执行过程截图如下
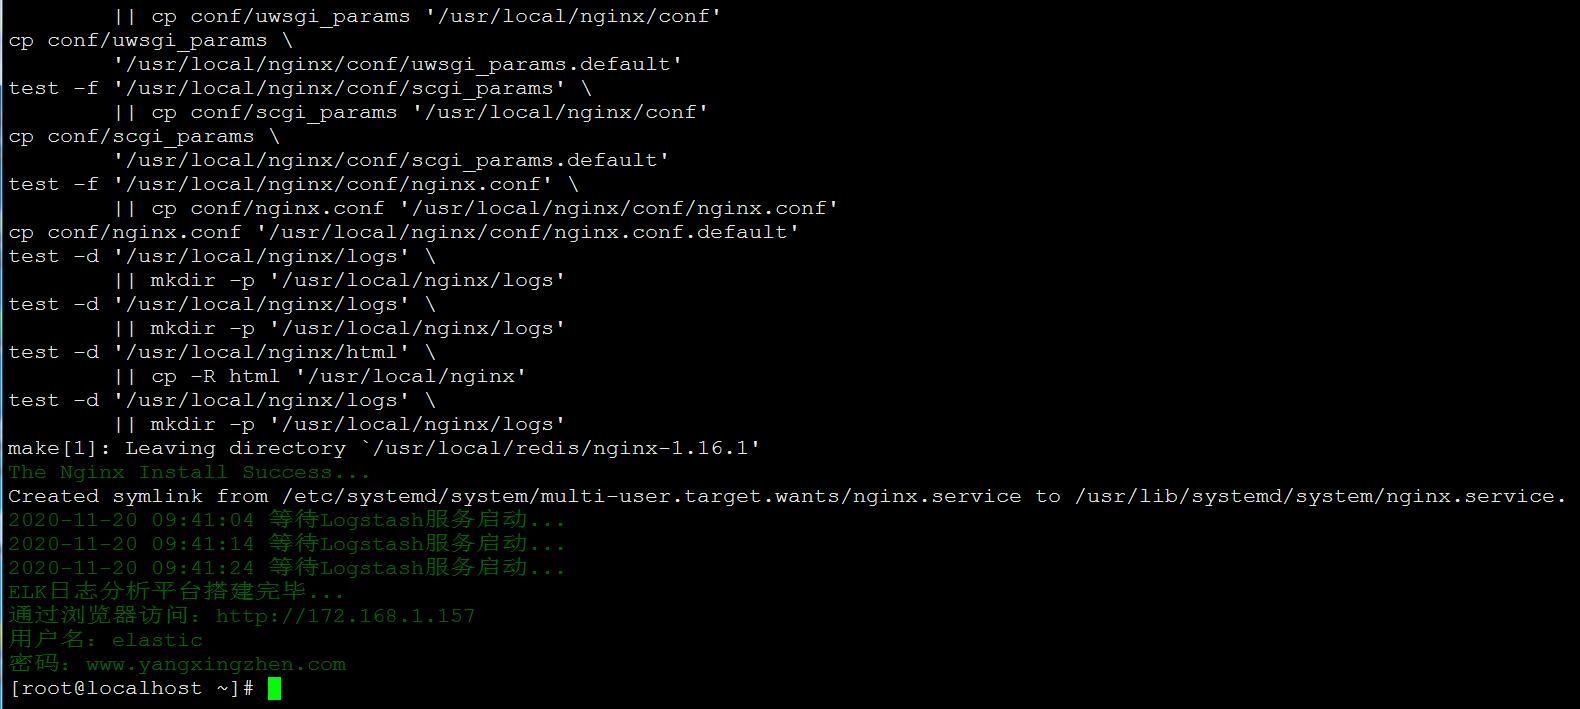


至此,Linux一键部署ELK+Filebeat+Nginx+Redis日志平台自动化脚本部署完毕。
若文章图片、下载链接等信息出错,请在评论区留言反馈,博主将第一时间更新!如本文“对您有用”,欢迎随意打赏,谢谢!
继续阅读
Wechat
微信扫一扫,加我!

微信公众号
微信扫一扫,关注我!

有瑕疵,安装完redis后,后面所有的包后下载到了/urs/local/redis
@ 剑走偏锋 你在下载前加入cd ~就行了。
@ 小柒博客 已经加了
@ 剑走偏锋 好的
@ 剑走偏锋 已经修复了