
一、phpMyAdmin简介
phpMyAdmin是一个以PHP为基础,以Web-Base方式架构在网站主机上的MySQL的数据库管理工具,让管理者可用Web接口管理MySQL数据库。借由此Web接口可以成为一个简易方式输入繁杂SQL语法的较佳途径,尤其要处理大量资料的汇入及汇出更为方便。其中一个更大的优势在于由于phpMyAdmin跟其他PHP程式一样在网页服务器上执行,但是您可以在任何地方使用这些程式产生的HTML页面,也就是于远端管理MySQL数据库,方便的建立、修改、删除数据库及资料表。也可借由phpMyAdmin建立常用的php语法,方便编写网页时所需要的sql语法正确性。
phpMyAdmin是一个非常受欢迎的基于web的MySQL数据库管理工具。它能够创建和删除数据库,创建/删除/修改表格,删除/编辑/新增字段,执行SQL脚本等。
二、phpMyAdmin安装
官网地址:https://www.phpmyadmin.net/
下载地址:https://www.phpmyadmin.net/downloads/
进入之后有download按钮,点击导航栏的Download链接,进入下载界面,这里下载最新版的5.0.2
PHP版本:7.1及以上
Mysql版本:5.5及以上
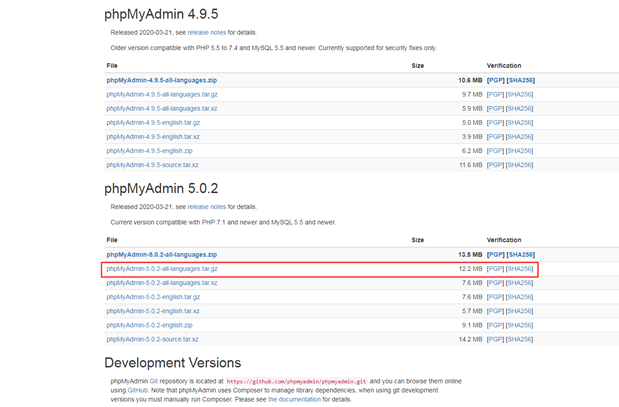
1、下载phpMyAdmin
[root@localhost ~]# wget https://files.phpmyadmin.net/phpMyAdmin/5.0.2/phpMyAdmin-5.0.2-all-languages.tar.gz
2、解压phpMyAdmin
[root@localhost ~]# tar xf phpMyAdmin-5.0.2-all-languages.tar.gz
3、拷贝到访问目录下面(根据自身目录配置)
[root@localhost ~]# mv phpMyAdmin-5.0.2-all-languages /usr/local/nginx/html/phpMyAdmin
4、修改phpMyAdmin配置文件
[root@localhost ~]# cd /usr/local/nginx/html/phpMyAdmin
[root@localhost phpMyAdmin]# cp config.sample.inc.php config.inc.php
[root@localhost phpMyAdmin]# vim config.inc.php
找到$cfg['blowfish_secret']配置项,后面默认为空,这里我们可以随便设置一个复杂的字符串,用来加密使用:
32位字符串:PTOb45P2yyV*XXEdXQsKhA1VtFKurcHG
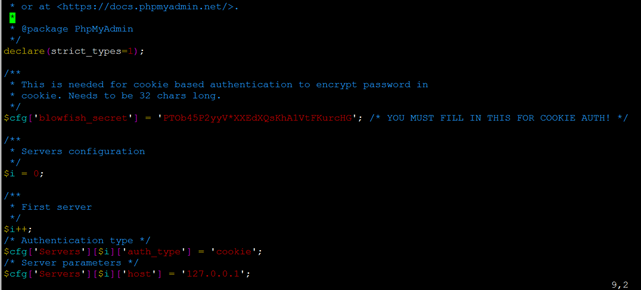
然后$cfg['Servers'][$i]['auth_type']这一项默认为cookie,表示每次都要登录,我们不用修改,这样比较安全,然后$cfg['Servers'][$i]['host'] = '127.0.0.1';这里建议设置成Mysql的IP地址(因为这里使用的数据库在本地),则无论是本地还是远程只要mysql授权都没有问题,一定要注意,建议使用IP地址。
/* Authentication type */
$cfg['Servers'][$i]['auth_type'] = 'cookie';
/* Server parameters */
$cfg['Servers'][$i]['host'] = '127.0.0.1';
$cfg['Servers'][$i]['compress'] = false;
$cfg['Servers'][$i]['AllowNoPassword'] = false;
保存并退出。
5、创建缓存模板文件目录
[root@localhost phpMyAdmin]# mkdir tmp
[root@localhost phpMyAdmin]# chown -R www.www /usr/local/nginx/html/phpMyAdmin
6、编辑Nginx配置文件(根据自身配置)
[root@localhost phpMyAdmin]# vim /usr/local/nginx/conf/nginx.conf
#配置内容如下
server {
        listen  80;
        server_name     localhost;
        location / {
        root    html/phpMyAdmin;
        index index.php index.html index.htm;
        }
        location ~* \.php$ {
        root    html/phpMyAdmin;
        fastcgi_connect_timeout 300s;
        fastcgi_send_timeout 300s;
        fastcgi_read_timeout 300s;
        fastcgi_buffer_size 64k;
        fastcgi_buffers 4 64k;
        fastcgi_busy_buffers_size 128k;
        fastcgi_temp_file_write_size 256k;
        fastcgi_pass    127.0.0.1:9000;
        fastcgi_index   index.php;
        fastcgi_param SCRIPT_FILENAME $document_root$fastcgi_script_name;
        include fastcgi_params;
        }
}
7、启动phpMyAdmin(使用的LNMP环境)
[root@localhost phpMyAdmin]# nginx -t
nginx: the configuration file /usr/local/nginx/conf/nginx.conf syntax is ok
nginx: configuration file /usr/local/nginx/conf/nginx.conf test is successful
[root@localhost phpMyAdmin]# nginx -s reload
8、访问phpMyAdmin
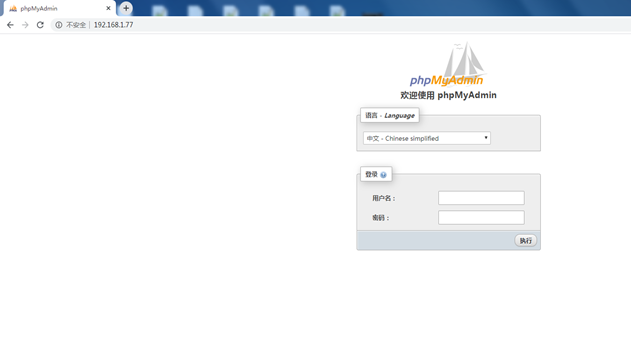
浏览器访问服务器IP+端口,如下图
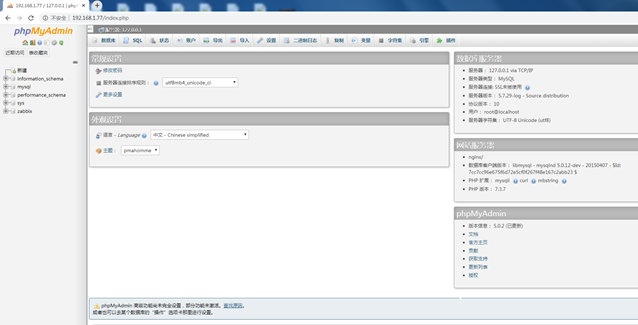
9、登录phpMyAdmin,输入用户名和密码,如下图
10、激活高级功能完全设置
在phpMyAdmin的sql目录下有个create_tables.sql文件。传到本地计算机等待上传
[root@localhost phpMyAdmin]# cd sql
[root@localhost sql]# ll
total 28
-rw-r--r-- 1 www www 10948 Mar 21 12:17 create_tables.sql
-rw-r--r-- 1 www www 1665 Mar 21 12:17 upgrade_column_info_4_3_0+.sql
-rw-r--r-- 1 www www 671 Mar 21 12:17 upgrade_tables_4_7_0+.sql
-rw-r--r-- 1 www www 5691 Mar 21 12:17 upgrade_tables_mysql_4_1_2+.sql
11、导入create_tables.sql文件
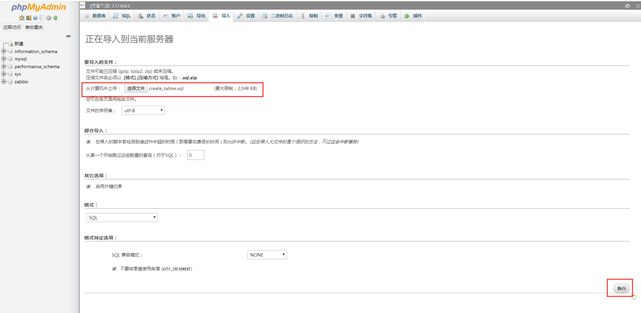
导入成功会生成phpmyadmin数据库。
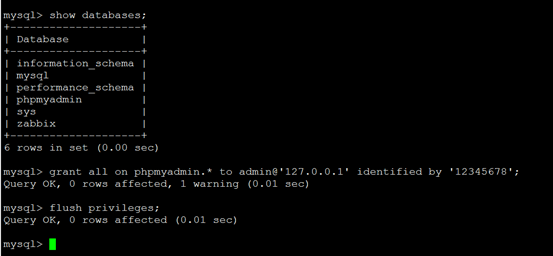
12、Mysql授权
进入Mysql控制台
mysql> grant all on phpmyadmin.* to admin@'127.0.0.1' identified by '12345678';
Query OK, 0 rows affected, 1 warning (0.01 sec)
mysql> flush privileges;
Query OK, 0 rows affected (0.01 sec)
13、修改config.inc.php文件
[root@localhost sql]# cd ..
[root@localhost phpMyAdmin]# vim config.inc.php
/* User used to manipulate with storage */
$cfg['Servers'][$i]['controlhost'] = '127.0.0.1';
$cfg['Servers'][$i]['controlport'] = '3306';
$cfg['Servers'][$i]['controluser'] = 'admin';
$cfg['Servers'][$i]['controlpass'] = '12345678';

/*Storage database and tables */
$cfg['Servers'][$i]['pmadb'] = 'phpmyadmin';
$cfg['Servers'][$i]['bookmarktable'] = 'pma__bookmark';
$cfg['Servers'][$i]['relation'] = 'pma__relation';
$cfg['Servers'][$i]['table_info'] = 'pma__table_info';
$cfg['Servers'][$i]['table_coords'] = 'pma__table_coords';
$cfg['Servers'][$i]['pdf_pages'] = 'pma__pdf_pages';
$cfg['Servers'][$i]['column_info'] = 'pma__column_info';
$cfg['Servers'][$i]['history'] = 'pma__history';
$cfg['Servers'][$i]['table_uiprefs'] = 'pma__table_uiprefs';
$cfg['Servers'][$i]['tracking'] = 'pma__tracking';
$cfg['Servers'][$i]['userconfig'] = 'pma__userconfig';
$cfg['Servers'][$i]['recent'] = 'pma__recent';
$cfg['Servers'][$i]['favorite'] = 'pma__favorite';
$cfg['Servers'][$i]['users'] = 'pma__users';
$cfg['Servers'][$i]['usergroups'] = 'pma__usergroups';
$cfg['Servers'][$i]['navigationhiding'] = 'pma__navigationhiding';
$cfg['Servers'][$i]['savedsearches'] = 'pma__savedsearches';
$cfg['Servers'][$i]['central_columns'] = 'pma__central_columns';
$cfg['Servers'][$i]['designer_settings'] = 'pma__designer_settings';
$cfg['Servers'][$i]['export_templates'] = 'pma__export_templates';
14、重启phpmyadmin
[root@localhost phpMyAdmin]# nginx -s reload
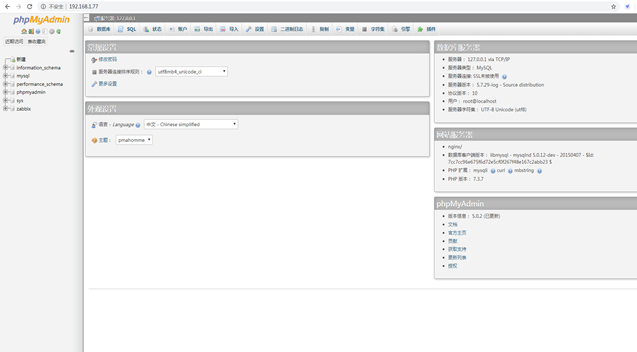
15、访问phpMyAdmin
浏览器访问服务器IP+端口,如下图
若文章图片、下载链接等信息出错,请在评论区留言反馈,博主将第一时间更新!如本文“对您有用”,欢迎随意打赏,谢谢!


评论