
一、Kubernetes简介
Kubernetes(简称K8S)是开源的容器集群管理系统,可以实现容器集群的自动化部署、自动扩缩容、维护等功能。它既是一款容器编排工具,也是全新的基于容器技术的分布式架构领先方案。在Docker技术的基础上,为容器化的应用提供部署运行、资源调度、服务发现和动态伸缩等功能,提高了大规模容器集群管理的便捷性。
K8S集群中有管理节点与工作节点两种类型。管理节点主要负责K8S集群管理,集群中各节点间的信息交互、任务调度,还负责容器、Pod、NameSpaces、PV等生命周期的管理。工作节点主要为容器和Pod提供计算资源,Pod及容器全部运行在工作节点上,工作节点通过kubelet服务与管理节点通信以管理容器的生命周期,并与集群其他节点进行通信。
二、K8s集群部署环境准备
1、环境架构
|
IP |
主机名 |
操作系统 |
Kubelet版本 |
用途 |
|
192.168.2.199 |
k8s-master |
CentOS 7.9.2009 |
v1.28.2 |
管理节点 |
|
192.168.2.198 |
k8s-node2 |
CentOS 7.9.2009 |
v1.28.2 |
工作节点 |
|
192.168.2.197 |
k8s-node1 |
CentOS 7.9.2009 |
v1.28.2 |
工作节点 |
2、配置主机名
注:以下操作所有节点需要执行
# Master
[root@localhost ~]# hostnamectl set-hostname k8s-master --static
# Node1
[root@localhost ~]# hostnamectl set-hostname k8s-node1 --static
# Node2
[root@localhost ~]# hostnamectl set-hostname k8s-node2 --static
[root@k8s-master ~]# cat >>/etc/hosts <<EOF
192.168.2.199 k8s-master
192.168.2.198 k8s-node2
192.168.2.197 k8s-node1
EOF
3、关闭防火墙和selinux
[root@k8s-master ~]# systemctl stop firewalld.service
[root@k8s-master ~]# systemctl disable firewalld.service
[root@k8s-master ~]# setenforce 0
[root@k8s-master ~]# sed -i "s/SELINUX=enforcing/SELINUX=disabled/g" /etc/selinux/config
4、关闭swap分区
[root@k8s-master ~]# swapoff -a
[root@k8s-master ~]# sed -i '/swap/s/^/#/g' /etc/fstab
5、配置内核参数和优化
[root@k8s-master ~]# cat >/etc/sysctl.d/k8s.conf <<EOF
net.bridge.bridge-nf-call-ip6tables = 1
net.bridge.bridge-nf-call-iptables = 1
net.ipv4.ip_forward = 1
EOF
[root@k8s-master ~]# sysctl --system
6、安装ipset、ipvsadm
[root@k8s-master ~]# yum -y install conntrack ipvsadm ipset jq iptables curl sysstat libseccomp wget vim net-tools git
[root@k8s-master ~]# cat >/etc/modules-load.d/ipvs.conf <<EOF
# Load IPVS at boot
ip_vs
ip_vs_rr
ip_vs_wrr
ip_vs_sh
nf_conntrack
nf_conntrack_ipv4
EOF
[root@k8s-master ~]# systemctl enable --now systemd-modules-load.service
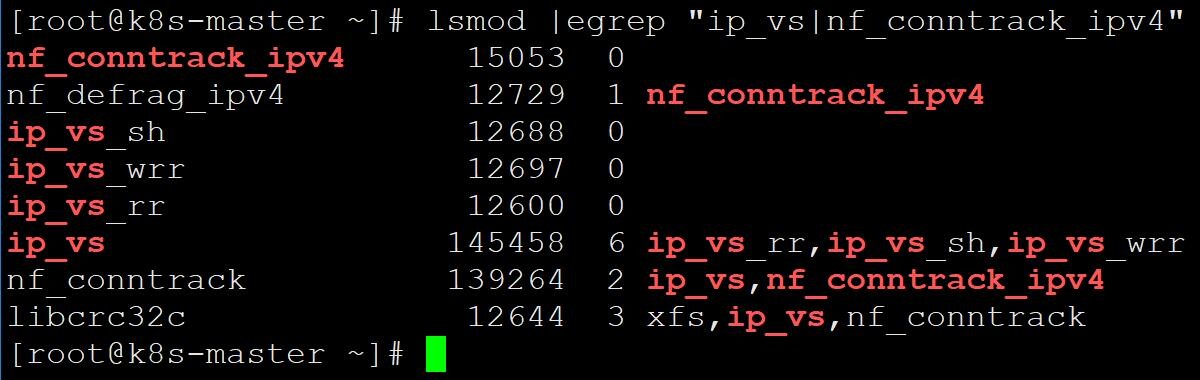
# 确认内核模块加载成功
[root@k8s-master ~]# lsmod |egrep "ip_vs|nf_conntrack_ipv4"
7、安装Docker
1)安装依赖包
[root@k8s-master ~]# yum -y install yum-utils device-mapper-persistent-data lvm2
2)添加阿里Docker源
[root@k8s-master ~]# yum-config-manager --add-repo https://mirrors.aliyun.com/docker-ce/linux/centos/docker-ce.repo
3)安装Docker
[root@k8s-master ~]# yum -y install docker-ce-20.10.23 docker-ce-cli-20.10.23
4)添加阿里云docker仓库加速器
[root@k8s-master ~]# mkdir -p /etc/docker
[root@k8s-master ~]# cat >/etc/docker/daemon.json <<EOF
{
"registry-mirrors": [
"https://hub-mirror.c.163.com",
"https://cr.console.aliyun.com",
"https://reg-mirror.qiniu.com"
],
"exec-opts": ["native.cgroupdriver=systemd"]
}
EOF
5)开机自启动Docker
[root@k8s-master ~]# systemctl enable docker
6)启动Docker
[root@k8s-master ~]# systemctl start docker
8、安装Cri-Dockerd
1)安装wget
[root@k8s-master ~]# yum -y install wget
2)下载安装包
[root@k8s-master ~]# wget -c https://github.com/Mirantis/cri-dockerd/releases/download/v0.3.1/cri-dockerd-0.3.1-3.el7.x86_64.rpm
3)安装Cri-Dockerd
[root@k8s-master ~]# yum -y install cri-dockerd-0.3.1-3.el7.x86_64.rpm
4)配置沙箱(pause)镜像
[root@k8s-master ~]# sed -i '/ExecStart/s#dockerd#& --network-plugin=cni --pod-infra-container-image=registry.aliyuncs.com/google_containers/pause:3.9#' /usr/lib/systemd/system/cri-docker.service
5)启动Cri-Dockerd
[root@k8s-master ~]# systemctl enable cri-docker
[root@k8s-master ~]# systemctl start cri-docker
三、安装kubectl、kubelet、kubeadm
1、添加阿里kubernetes源
[root@k8s-master ~]# cat >/etc/yum.repos.d/kubernetes.repo <<EOF
[kubernetes]
name=Kubernetes
baseurl=https://mirrors.aliyun.com/kubernetes/yum/repos/kubernetes-el7-x86_64/
enabled=1
gpgcheck=0
repo_gpgcheck=0
gpgkey=https://mirrors.aliyun.com/kubernetes/yum/doc/yum-key.gpg https://mirrors.aliyun.com/kubernetes/yum/doc/rpm-package-key.gpg
EOF
2、安装kubectl、kubelet、kubeadm
1)查看所有的可用版本
[root@localhost ~]# yum --showduplicates list kubelet |grep 1.28
kubelet.x86_64 1.28.0-0 kubernetes
kubelet.x86_64 1.28.1-0 kubernetes
kubelet.x86_64 1.28.2-0 kubernetes
2)这里安装当前最新版本1.28.2
[root@k8s-master ~]# yum -y install kubectl-1.28.2 kubelet-1.28.2 kubeadm-1.28.2
3)启动kubelet
[root@k8s-master ~]# systemctl enable kubelet
[root@k8s-master ~]# systemctl start kubelet
四、部署Kubernetes集群
1、初始化Kubernetes集群
1)查看k8s v1.28.2初始化所需要的镜像
[root@k8s-master ~]# kubeadm config images list --kubernetes-version=v1.28.2
registry.k8s.io/kube-apiserver:v1.28.2
registry.k8s.io/kube-controller-manager:v1.28.2
registry.k8s.io/kube-scheduler:v1.28.2
registry.k8s.io/kube-proxy:v1.28.2
registry.k8s.io/pause:3.9
registry.k8s.io/etcd:3.5.9-0
registry.k8s.io/coredns/coredns:v1.10.1
2)初始化K8s集群
[root@k8s-master ~]# kubeadm init --kubernetes-version=1.28.2 \
--apiserver-advertise-address=192.168.0.199 \
--image-repository registry.aliyuncs.com/google_containers \
--service-cidr=172.15.0.0/16 --pod-network-cidr=172.16.0.0/16 \
--cri-socket unix:///var/run/cri-dockerd.sock
注:pod的网段为: 172.16.0.0/16,api server地址为Master本机IP,网段可以自定义,不冲突即可。
这一步很关键,由于kubeadm 默认从官网k8s.grc.io下载所需镜像,国内无法访问,因此需要通过–image-repository指定阿里云镜像仓库地址。
集群初始化成功后返回如下信息:
[init] Using Kubernetes version: v1.28.2
[preflight] Running pre-flight checks
[preflight] Pulling images required for setting up a Kubernetes cluster
[preflight] This might take a minute or two, depending on the speed of your internet connection
[preflight] You can also perform this action in beforehand using 'kubeadm config images pull'
[certs] Using certificateDir folder "/etc/kubernetes/pki"
[certs] Generating "ca" certificate and key
[certs] Generating "apiserver" certificate and key
[certs] apiserver serving cert is signed for DNS names [k8s-master kubernetes kubernetes.default kubernetes.default.svc kubernetes.default.svc.cluster.local] and IPs [172.15.0.1 192.168.2.199]
[certs] Generating "apiserver-kubelet-client" certificate and key
[certs] Generating "front-proxy-ca" certificate and key
[certs] Generating "front-proxy-client" certificate and key
[certs] Generating "etcd/ca" certificate and key
[certs] Generating "etcd/server" certificate and key
[certs] etcd/server serving cert is signed for DNS names [k8s-master localhost] and IPs [192.168.2.199 127.0.0.1 ::1]
[certs] Generating "etcd/peer" certificate and key
[certs] etcd/peer serving cert is signed for DNS names [k8s-master localhost] and IPs [192.168.2.199 127.0.0.1 ::1]
[certs] Generating "etcd/healthcheck-client" certificate and key
[certs] Generating "apiserver-etcd-client" certificate and key
[certs] Generating "sa" key and public key
[kubeconfig] Using kubeconfig folder "/etc/kubernetes"
[kubeconfig] Writing "admin.conf" kubeconfig file
[kubeconfig] Writing "kubelet.conf" kubeconfig file
[kubeconfig] Writing "controller-manager.conf" kubeconfig file
[kubeconfig] Writing "scheduler.conf" kubeconfig file
[etcd] Creating static Pod manifest for local etcd in "/etc/kubernetes/manifests"
[control-plane] Using manifest folder "/etc/kubernetes/manifests"
[control-plane] Creating static Pod manifest for "kube-apiserver"
[control-plane] Creating static Pod manifest for "kube-controller-manager"
[control-plane] Creating static Pod manifest for "kube-scheduler"
[kubelet-start] Writing kubelet environment file with flags to file "/var/lib/kubelet/kubeadm-flags.env"
[kubelet-start] Writing kubelet configuration to file "/var/lib/kubelet/config.yaml"
[kubelet-start] Starting the kubelet
[wait-control-plane] Waiting for the kubelet to boot up the control plane as static Pods from directory "/etc/kubernetes/manifests". This can take up to 4m0s
[apiclient] All control plane components are healthy after 5.001827 seconds
[upload-config] Storing the configuration used in ConfigMap "kubeadm-config" in the "kube-system" Namespace
[kubelet] Creating a ConfigMap "kubelet-config" in namespace kube-system with the configuration for the kubelets in the cluster
[upload-certs] Skipping phase. Please see --upload-certs
[mark-control-plane] Marking the node k8s-master as control-plane by adding the labels: [node-role.kubernetes.io/control-plane node.kubernetes.io/exclude-from-external-load-balancers]
[mark-control-plane] Marking the node k8s-master as control-plane by adding the taints [node-role.kubernetes.io/control-plane:NoSchedule]
[bootstrap-token] Using token: 576zsz.tiwoz7oawmhji7tp
[bootstrap-token] Configuring bootstrap tokens, cluster-info ConfigMap, RBAC Roles
[bootstrap-token] Configured RBAC rules to allow Node Bootstrap tokens to get nodes
[bootstrap-token] Configured RBAC rules to allow Node Bootstrap tokens to post CSRs in order for nodes to get long term certificate credentials
[bootstrap-token] Configured RBAC rules to allow the csrapprover controller automatically approve CSRs from a Node Bootstrap Token
[bootstrap-token] Configured RBAC rules to allow certificate rotation for all node client certificates in the cluster
[bootstrap-token] Creating the "cluster-info" ConfigMap in the "kube-public" namespace
[kubelet-finalize] Updating "/etc/kubernetes/kubelet.conf" to point to a rotatable kubelet client certificate and key
[addons] Applied essential addon: CoreDNS
[addons] Applied essential addon: kube-proxy
Your Kubernetes control-plane has initialized successfully!
To start using your cluster, you need to run the following as a regular user:
mkdir -p $HOME/.kube
sudo cp -i /etc/kubernetes/admin.conf $HOME/.kube/config
sudo chown $(id -u):$(id -g) $HOME/.kube/config
Alternatively, if you are the root user, you can run:
export KUBECONFIG=/etc/kubernetes/admin.conf
You should now deploy a pod network to the cluster.
Run "kubectl apply -f [podnetwork].yaml" with one of the options listed at:
https://kubernetes.io/docs/concepts/cluster-administration/addons/
Then you can join any number of worker nodes by running the following on each as root:
kubeadm join 192.168.2.199:6443 --token 576zsz.tiwoz7oawmhji7tp \
--discovery-token-ca-cert-hash sha256:4159fbebbdef7497caf499f6af071ec4b2df004edde7d08c48828740d37136c0
注:记录生成的最后部分内容,此内容需要在其它节点加入Kubernetes集群时执行。
2、根据提示创建kubectl
[root@k8s-master ~]# mkdir -p $HOME/.kube
[root@k8s-master ~]# sudo cp -i /etc/kubernetes/admin.conf $HOME/.kube/config
[root@k8s-master ~]# sudo chown $(id -u):$(id -g) $HOME/.kube/config
[root@k8s-master ~]# export KUBECONFIG=/etc/kubernetes/admin.conf
3、查看node节点和Pod
[root@k8s-master ~]# kubectl get node
[root@k8s-master ~]# kubectl get pod -A
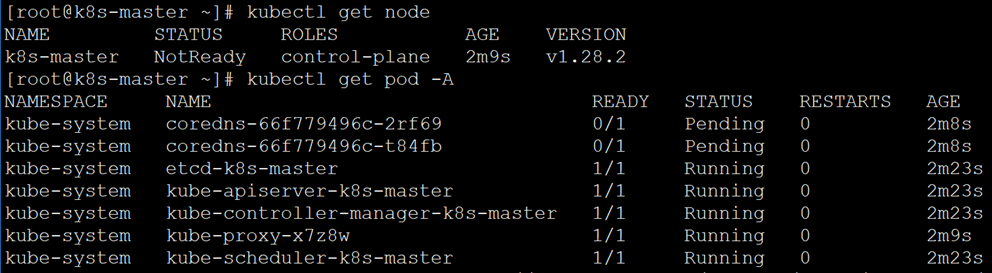
注:Node节点为NotReady,因为corednspod没有启动,缺少网络pod
4、安装Pod网络插件calico(CNI)
[root@k8s-master ~]# kubectl apply -f https://docs.tigera.io/archive/v3.24/manifests/calico.yaml
poddisruptionbudget.policy/calico-kube-controllers created
serviceaccount/calico-kube-controllers created
serviceaccount/calico-node created
configmap/calico-config created
customresourcedefinition.apiextensions.k8s.io/bgpconfigurations.crd.projectcalico.org created
customresourcedefinition.apiextensions.k8s.io/bgppeers.crd.projectcalico.org created
customresourcedefinition.apiextensions.k8s.io/blockaffinities.crd.projectcalico.org created
customresourcedefinition.apiextensions.k8s.io/caliconodestatuses.crd.projectcalico.org created
customresourcedefinition.apiextensions.k8s.io/clusterinformations.crd.projectcalico.org created
customresourcedefinition.apiextensions.k8s.io/felixconfigurations.crd.projectcalico.org created
customresourcedefinition.apiextensions.k8s.io/globalnetworkpolicies.crd.projectcalico.org created
customresourcedefinition.apiextensions.k8s.io/globalnetworksets.crd.projectcalico.org created
customresourcedefinition.apiextensions.k8s.io/hostendpoints.crd.projectcalico.org created
customresourcedefinition.apiextensions.k8s.io/ipamblocks.crd.projectcalico.org created
customresourcedefinition.apiextensions.k8s.io/ipamconfigs.crd.projectcalico.org created
customresourcedefinition.apiextensions.k8s.io/ipamhandles.crd.projectcalico.org created
customresourcedefinition.apiextensions.k8s.io/ippools.crd.projectcalico.org created
customresourcedefinition.apiextensions.k8s.io/ipreservations.crd.projectcalico.org created
customresourcedefinition.apiextensions.k8s.io/kubecontrollersconfigurations.crd.projectcalico.org created
customresourcedefinition.apiextensions.k8s.io/networkpolicies.crd.projectcalico.org created
customresourcedefinition.apiextensions.k8s.io/networksets.crd.projectcalico.org created
clusterrole.rbac.authorization.k8s.io/calico-kube-controllers created
clusterrole.rbac.authorization.k8s.io/calico-node created
clusterrolebinding.rbac.authorization.k8s.io/calico-kube-controllers created
clusterrolebinding.rbac.authorization.k8s.io/calico-node created
daemonset.apps/calico-node created
deployment.apps/calico-kube-controllers created
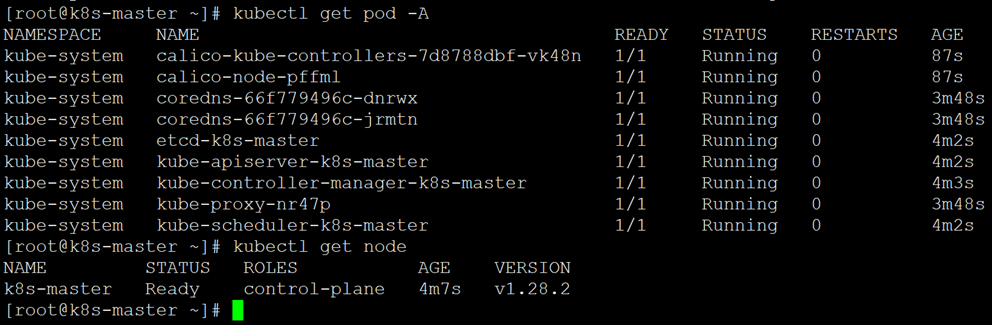
5、再次查看pod和node
[root@k8s-master ~]# kubectl get pod -A
[root@k8s-master ~]# kubectl get node
6、添加工作节点加入Kubernetes集群
[root@k8s-node1 ~]# kubeadm join 192.168.2.199:6443 --token 576zsz.tiwoz7oawmhji7tp \
--discovery-token-ca-cert-hash sha256:4159fbebbdef7497caf499f6af071ec4b2df004edde7d08c48828740d37136c0
[root@k8s-node2 ~]# kubeadm join 192.168.2.199:6443 --token 576zsz.tiwoz7oawmhji7tp \
--discovery-token-ca-cert-hash sha256:4159fbebbdef7497caf499f6af071ec4b2df004edde7d08c48828740d37136c0
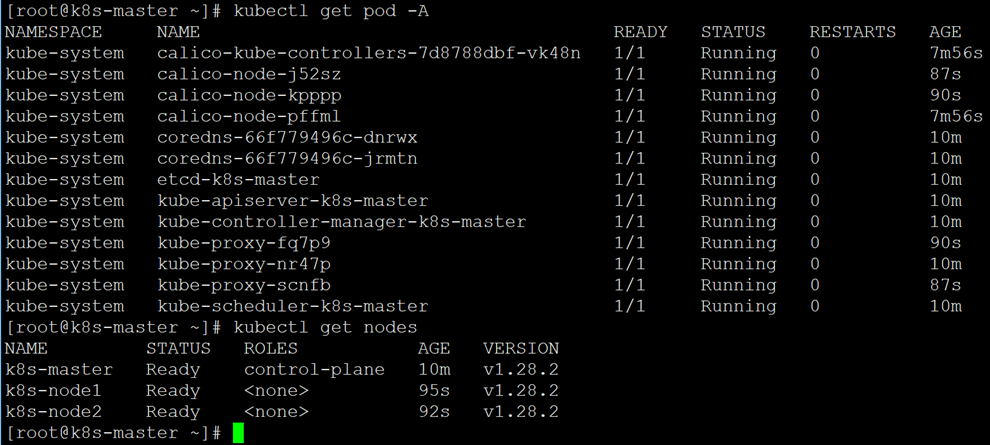
7、再次查看Node
[root@k8s-master ~]# kubectl get nodes
8、kubectl命令补全功能
[root@k8s-master ~]# yum -y install bash-completion
[root@k8s-master ~]# echo "source <(kubectl completion bash)" >> /etc/profile
[root@k8s-master ~]# source /etc/profile
五、安装kubernetes-dashboard
注:官方部署dashboard的服务没使用nodeport,将yaml文件下载到本地,在service里添加nodeport。
1、下载配置文件
[root@k8s-master ~]# wget https://raw.githubusercontent.com/kubernetes/dashboard/v2.7.0/aio/deploy/recommended.yaml
2、修改配置文件
[root@k8s-master ~]# vim recommended.yaml
# 需要修改的内容如下所示
kind: Service
apiVersion: v1
metadata:
  labels:
    k8s-app: kubernetes-dashboard
  name: kubernetes-dashboard
  namespace: kubernetes-dashboard
spec:
  type: NodePort       # 增加内容
  ports:
    - port: 443
      targetPort: 8443
      nodePort: 30000  # 增加内容
  selector:
    k8s-app: kubernetes-dashboard
[root@k8s-master ~]# kubectl apply -f recommended.yaml
namespace/kubernetes-dashboard created
serviceaccount/kubernetes-dashboard created
service/kubernetes-dashboard created
secret/kubernetes-dashboard-certs created
secret/kubernetes-dashboard-csrf created
secret/kubernetes-dashboard-key-holder created
configmap/kubernetes-dashboard-settings created
role.rbac.authorization.k8s.io/kubernetes-dashboard created
clusterrole.rbac.authorization.k8s.io/kubernetes-dashboard created
rolebinding.rbac.authorization.k8s.io/kubernetes-dashboard created
clusterrolebinding.rbac.authorization.k8s.io/kubernetes-dashboard created
deployment.apps/kubernetes-dashboard created
service/dashboard-metrics-scraper created
deployment.apps/dashboard-metrics-scraper created
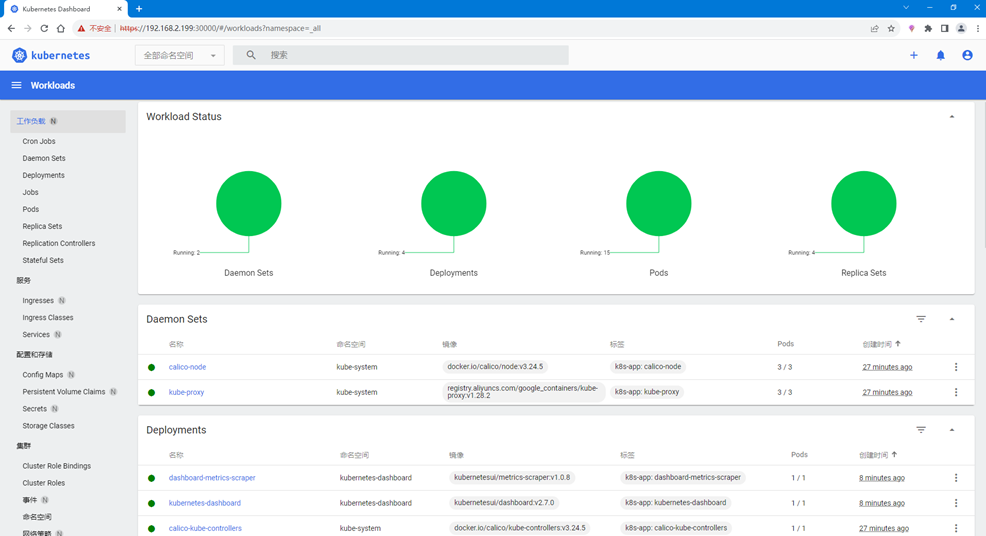
3、查看pod和service
[root@k8s-master ~]# kubectl get pod,svc -n kubernetes-dashboard

4、访问Dashboard页面
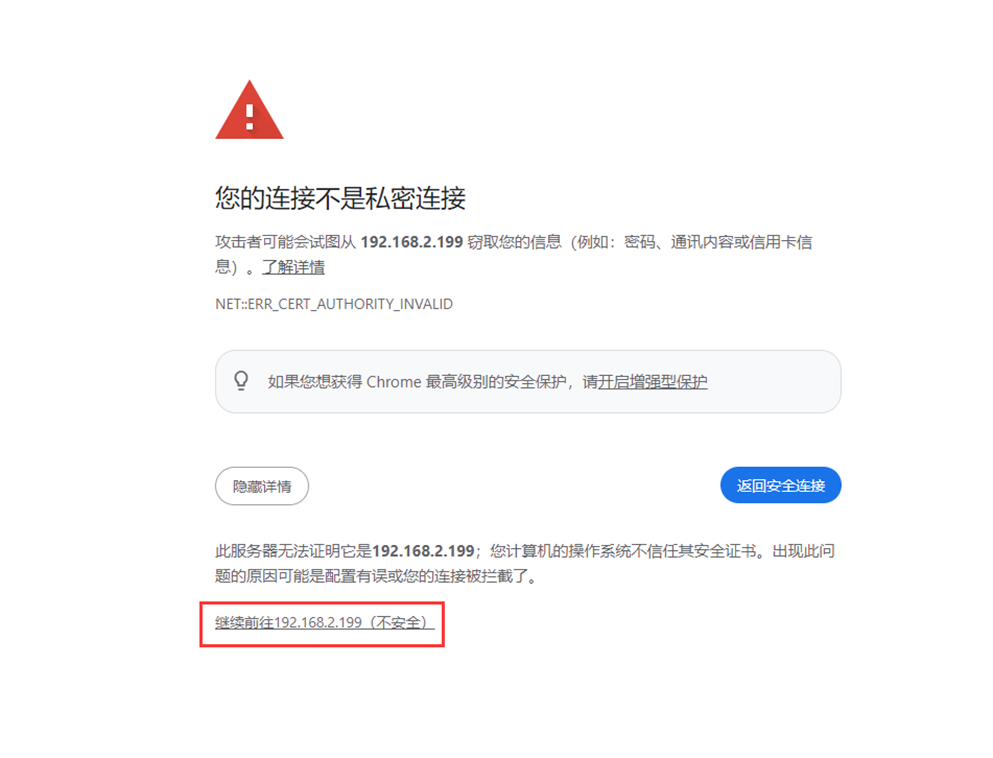
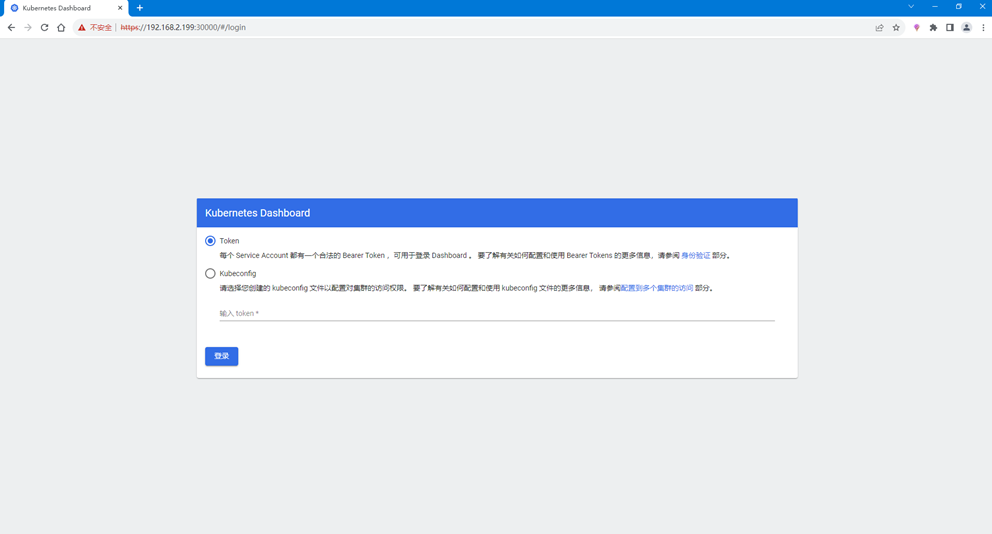
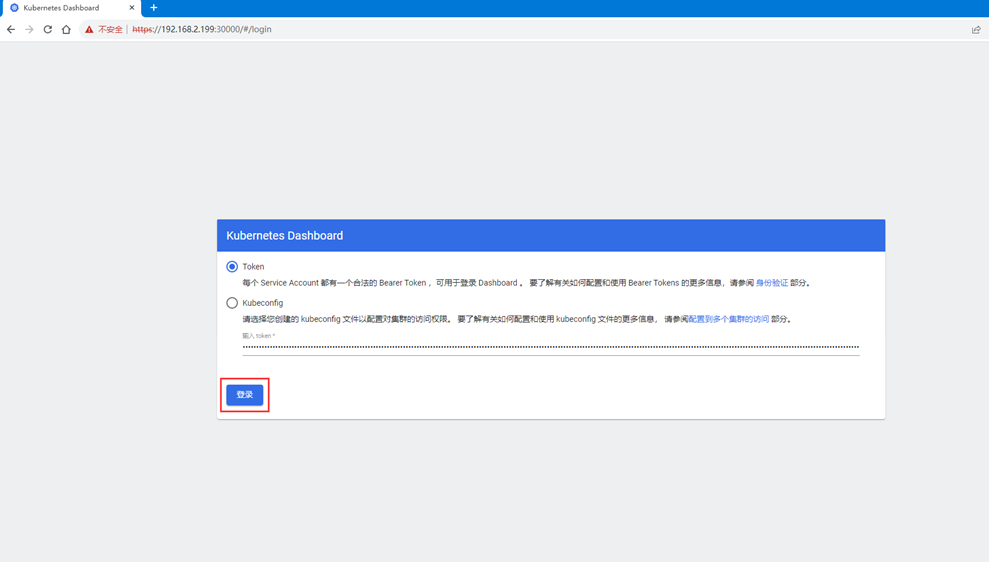
# 浏览器输入https://192.168.2.199:30000/,如下图所示
5、创建用户
[root@k8s-master ~]# vim dashboard-admin.yaml
apiVersion: v1
kind: ServiceAccount
metadata:
  name: admin
  namespace: kubernetes-dashboard

---
apiVersion: rbac.authorization.k8s.io/v1
kind: ClusterRoleBinding
metadata:
  name: admin
roleRef:
  apiGroup: rbac.authorization.k8s.io
  kind: ClusterRole
  name: cluster-admin
subjects:
- kind: ServiceAccount
  name: admin
  namespace: kubernetes-dashboard

---
apiVersion: v1
kind: Secret
metadata:
  name: kubernetes-dashboard-admin
  namespace: kubernetes-dashboard
  annotations:
    kubernetes.io/service-account.name: "admin"
type: kubernetes.io/service-account-token
[root@k8s-master ~]# kubectl apply -f dashboard-admin.yaml
serviceaccount/admin created
clusterrolebinding.rbac.authorization.k8s.io/admin created
secret/kubernetes-dashboard-admin created
6、创建Token
[root@k8s-master ~]# kubectl -n kubernetes-dashboard create token admin
eyJhbGciOiJSUzI1NiIsImtpZCI6ImlkUzhwaG5MVFBrU2VfS05LeWlPZVRaWm9kTWxCMG1WUFBVRi1mNE1mUncifQ.eyJhdWQiOlsiaHR0cHM6Ly9rdWJlcm5ldGVzLmRlZmF1bHQuc3ZjLmNsdXN0ZXIubG9jYWwiXSwiZXhwIjoxNzAwMTMxOTQzLCJpYXQiOjE3MDAxMjgzNDMsImlzcyI6Imh0dHBzOi8va3ViZXJuZXRlcy5kZWZhdWx0LnN2Yy5jbHVzdGVyLmxvY2FsIiwia3ViZXJuZXRlcy5pbyI6eyJuYW1lc3BhY2UiOiJrdWJlcm5ldGVzLWRhc2hib2FyZCIsInNlcnZpY2VhY2NvdW50Ijp7Im5hbWUiOiJhZG1pbiIsInVpZCI6ImRlMzYxM2Y4LTJhMGEtNDFlZC04MWM2LTZhMGMxMTJkMDQ5ZSJ9fSwibmJmIjoxNzAwMTI4MzQzLCJzdWIiOiJzeXN0ZW06c2VydmljZWFjY291bnQ6a3ViZXJuZXRlcy1kYXNoYm9hcmQ6YWRtaW4ifQ.peUaifpZ83eTj0ooVcxqCqEv3gGJ3J1UDVyIaLuSpb9imSSbm2RBAyFir75oG3eKlRJqLxxGEhlmS9AqSEc1_BUtr2Rg0ThQoCGN_VQAQQvo2KFNieluUEQecCtASGIQr_oxr6trwp_Wc1O4MwgfAiiQdzP0PWUczdadvX0rkMNV06FuOGjM983CcD4Jr_HRMxOcoAVrbnN6MNoX8AyjVKRWnavtcjrJpsNd_wzWvu2xopRDLcjJKGyS_Cev1sAtUqyB50c8s9KBOOfP-IBhj8u7XuAte2JoVr5xDbTp1hIS1sS3FzZT6RUKAxfYgAmIm_mj8bMJu_yQz0oC0Z2l3g
7、获取Token
[root@k8s-master ~]# Token=$(kubectl -n kubernetes-dashboard get secret |awk '/kubernetes-dashboard-admin/ {print $1}')
[root@k8s-master ~]# kubectl describe secrets -n kubernetes-dashboard ${Token} |grep token |awk 'NR==NF {print $2}'
eyJhbGciOiJSUzI1NiIsImtpZCI6ImlkUzhwaG5MVFBrU2VfS05LeWlPZVRaWm9kTWxCMG1WUFBVRi1mNE1mUncifQ.eyJpc3MiOiJrdWJlcm5ldGVzL3NlcnZpY2VhY2NvdW50Iiwia3ViZXJuZXRlcy5pby9zZXJ2aWNlYWNjb3VudC9uYW1lc3BhY2UiOiJrdWJlcm5ldGVzLWRhc2hib2FyZCIsImt1YmVybmV0ZXMuaW8vc2VydmljZWFjY291bnQvc2VjcmV0Lm5hbWUiOiJrdWJlcm5ldGVzLWRhc2hib2FyZC1hZG1pbiIsImt1YmVybmV0ZXMuaW8vc2VydmljZWFjY291bnQvc2VydmljZS1hY2NvdW50Lm5hbWUiOiJhZG1pbiIsImt1YmVybmV0ZXMuaW8vc2VydmljZWFjY291bnQvc2VydmljZS1hY2NvdW50LnVpZCI6ImRlMzYxM2Y4LTJhMGEtNDFlZC04MWM2LTZhMGMxMTJkMDQ5ZSIsInN1YiI6InN5c3RlbTpzZXJ2aWNlYWNjb3VudDprdWJlcm5ldGVzLWRhc2hib2FyZDphZG1pbiJ9.C_q72ySpalnBu2TG9DMvrPQ85Wcm2A7N6LYpVCz7z2uCcklc69xEhcZ9TEZ7r9ECfea7PKnmQvCk18pte2ur9TQqworLw-51a5pshNNZThpEjUA5Sw87OaDyY5LiTZTazEruGrm2L5iuYUFrZoo2hj1L7gytv3a67YQ9UvCv654n9jkiCmBvtbf_L27-g_rqQkeWV6OCG1-jnazHKBL4qM_fcfpQya6Rd1VIcs1hQ4Uh8CUhR7LHhpYpW1bJhBnoemBATmYVU2K9ZFz_zs9butSEr9DLa_JKF8Bw61Onrks7pHmuuI-Zg58WXuv5oeSk2LypE9yvHZJo_HMlQw5asQ
8、使用Token登录Dashboard
注:登录后如果没有namespace可选,并且提示找不到资源,那么就是权限不足问题导致,可通过以下命令授权
[root@k8s-master ~]# kubectl create clusterrolebinding serviceaccount-cluster-admin --clusterrole=cluster-admin --user=system:serviceaccount:kubernetes-dashboard:kubernetes-dashboard
若文章图片、下载链接等信息出错,请在评论区留言反馈,博主将第一时间更新!如本文“对您有用”,欢迎随意打赏,谢谢!


评论