
一、Kubernetes简介
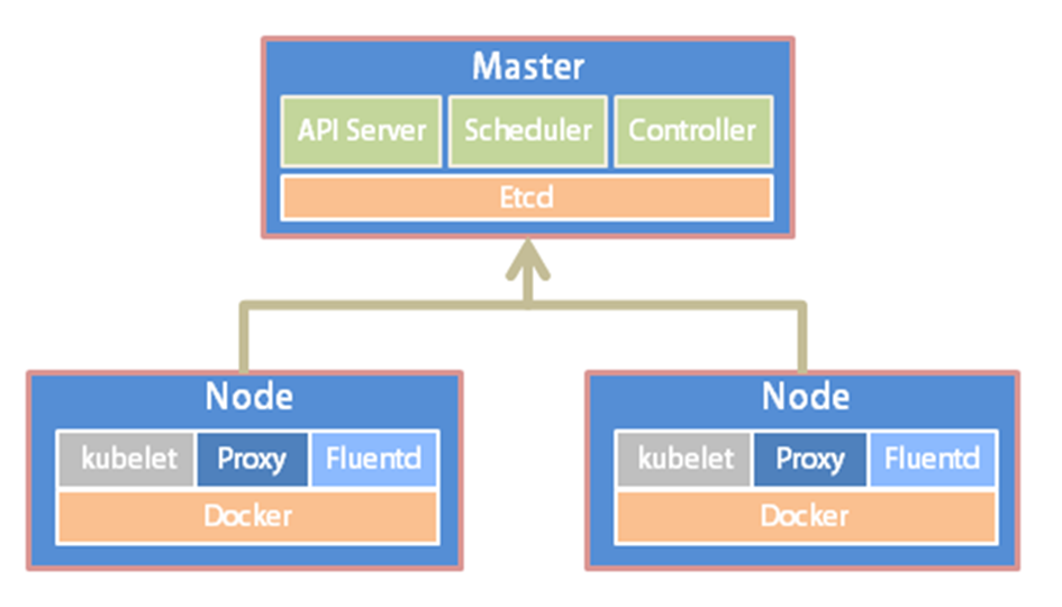
Kubernetes(简称K8S)是开源的容器集群管理系统,可以实现容器集群的自动化部署、自动扩缩容、维护等功能。它既是一款容器编排工具,也是全新的基于容器技术的分布式架构领先方案。在Docker技术的基础上,为容器化的应用提供部署运行、资源调度、服务发现和动态伸缩等功能,提高了大规模容器集群管理的便捷性。
K8S集群中有管理节点与工作节点两种类型。管理节点主要负责K8S集群管理,集群中各节点间的信息交互、任务调度,还负责容器、Pod、NameSpaces、PV等生命周期的管理。工作节点主要为容器和Pod提供计算资源,Pod及容器全部运行在工作节点上,工作节点通过kubelet服务与管理节点通信以管理容器的生命周期,并与集群其他节点进行通信。
二、系统准备
1、查看系统版本
[root@localhost ~]# cat /etc/redhat-release
CentOS Linux release 7.8.2003 (Core)
2、配置固定IP
[root@localhost ~]# cat /etc/sysconfig/network-scripts/ifcfg-ens32
# Generated by parse-kickstart
DEVICE="ens32"
IPV6INIT="no"
BOOTPROTO="static"
UUID="94513ff2-d82f-4409-9fe9-d29beda7c9f9"
ONBOOT="yes"
IPADDR=172.168.1.244
NETMASK=255.255.255.0
GATEWAY=172.168.1.254
DNS1=202.96.134.133
DNS2=114.114.114.114
3、配置主机名
[root@localhost ~]# hostnamectl set-hostname Master --static
[root@localhost ~]# su -
[root@Master ~]# echo "172.168.1.244 Master" >>/etc/hosts
4、关闭swap,注释swap分区
[root@Master ~]# swapoff -a
[root@Master ~]# cat /etc/fstab
#
# /etc/fstab
# Created by anaconda on Wed Aug 26 11:35:24 2020
#
# Accessible filesystems, by reference, are maintained under '/dev/disk'
# See man pages fstab(5), findfs(8), mount(8) and/or blkid(8) for more info
#
UUID=28b815c0-6d1f-470d-b52c-6ececdd015ab             /            xfs     defaults        0 0
UUID=6913149f-a6c7-487f-a0ff-0aea30cf9aa8                 /boot     xfs     defaults        0 0
#UUID=80720715-69f0-4d0f-b1f8-151e963dcfde             swap     swap    defaults        0 0
5、配置内核参数,将桥接的IPv4流量传递到iptables的链
[root@Master ~]# cat > /etc/sysctl.d/k8s.conf <<EOF
net.bridge.bridge-nf-call-ip6tables = 1
net.bridge.bridge-nf-call-iptables = 1
EOF
[root@Master ~]# sysctl --system
6、安装Docker
[root@Master ~]# curl -fsSL https://get.docker.com | bash -s docker --mirror Aliyun
[root@Master ~]# systemctl enable docker
[root@Master ~]# systemctl start docker
7、添加阿里云docker仓库加速器
[root@Master ~]# mkdir -p /etc/docker
[root@Master ~]# cat >/etc/docker/daemon.json <<EOF
{
"registry-mirrors": ["https://fl791z1h.mirror.aliyuncs.com"]
}
EOF
[root@Master ~]# systemctl daemon-reload
[root@Master ~]# systemctl restart docker
三、安装kubectl、kubelet、kubeadm
1、添加阿里kubernetes源
[root@Master ~]# cat > /etc/yum.repos.d/kubernetes.repo <<EOF
[kubernetes]
name=Kubernetes
baseurl=https://mirrors.aliyun.com/kubernetes/yum/repos/kubernetes-el7-x86_64/
enabled=1
gpgcheck=1
repo_gpgcheck=1
gpgkey=https://mirrors.aliyun.com/kubernetes/yum/doc/yum-key.gpg https://mirrors.aliyun.com/kubernetes/yum/doc/rpm-package-key.gpg
EOF
2、安装kubectl、kubelet、kubeadm
[root@Master ~]# yum -y install kubectl kubelet kubeadm
[root@Master ~]# systemctl start kubelet
[root@Master ~]# systemctl enable kubelet
3、初始化k8s集群
[root@Master ~]# kubeadm init --kubernetes-version=1.18.0 \
--apiserver-advertise-address=172.168.1.244 \
--image-repository registry.aliyuncs.com/google_containers \
--service-cidr=10.10.0.0/16 --pod-network-cidr=10.122.0.0/16
注:pod的网段为: 10.122.0.0/16,api server地址为Master本机IP,网段可以自定义,不冲突即可。
这一步很关键,由于kubeadm 默认从官网k8s.grc.io下载所需镜像,国内无法访问,因此需要通过–image-repository指定阿里云镜像仓库地址。
集群初始化成功后返回如下信息:
W0827 09:39:27.978003   18574 configset.go:202] WARNING: kubeadm cannot validate component configs for API groups [kubelet
.config.k8s.io kubeproxy.config.k8s.io][init] Using Kubernetes version: v1.18.0
[preflight] Running pre-flight checks
	[WARNING IsDockerSystemdCheck]: detected "cgroupfs" as the Docker cgroup driver. The recommended driver is "system
d". Please follow the guide at https://kubernetes.io/docs/setup/cri/[preflight] Pulling images required for setting up a Kubernetes cluster
[preflight] This might take a minute or two, depending on the speed of your internet connection
[preflight] You can also perform this action in beforehand using 'kubeadm config images pull'
[kubelet-start] Writing kubelet environment file with flags to file "/var/lib/kubelet/kubeadm-flags.env"
[kubelet-start] Writing kubelet configuration to file "/var/lib/kubelet/config.yaml"
[kubelet-start] Starting the kubelet
[certs] Using certificateDir folder "/etc/kubernetes/pki"
[certs] Generating "ca" certificate and key
[certs] Generating "apiserver" certificate and key
[certs] apiserver serving cert is signed for DNS names [master kubernetes kubernetes.default kubernetes.default.svc kubern
etes.default.svc.cluster.local] and IPs [10.10.0.1 172.168.1.244][certs] Generating "apiserver-kubelet-client" certificate and key
[certs] Generating "front-proxy-ca" certificate and key
[certs] Generating "front-proxy-client" certificate and key
[certs] Generating "etcd/ca" certificate and key
[certs] Generating "etcd/server" certificate and key
[certs] etcd/server serving cert is signed for DNS names [master localhost] and IPs [172.168.1.244 127.0.0.1 ::1]
[certs] Generating "etcd/peer" certificate and key
[certs] etcd/peer serving cert is signed for DNS names [master localhost] and IPs [172.168.1.244 127.0.0.1 ::1]
[certs] Generating "etcd/healthcheck-client" certificate and key
[certs] Generating "apiserver-etcd-client" certificate and key
[certs] Generating "sa" key and public key
[kubeconfig] Using kubeconfig folder "/etc/kubernetes"
[kubeconfig] Writing "admin.conf" kubeconfig file
[kubeconfig] Writing "kubelet.conf" kubeconfig file
[kubeconfig] Writing "controller-manager.conf" kubeconfig file
[kubeconfig] Writing "scheduler.conf" kubeconfig file
[control-plane] Using manifest folder "/etc/kubernetes/manifests"
[control-plane] Creating static Pod manifest for "kube-apiserver"
[control-plane] Creating static Pod manifest for "kube-controller-manager"
W0827 09:40:40.567020   18574 manifests.go:225] the default kube-apiserver authorization-mode is "Node,RBAC"; using "Node,
RBAC"[control-plane] Creating static Pod manifest for "kube-scheduler"
W0827 09:40:40.568440   18574 manifests.go:225] the default kube-apiserver authorization-mode is "Node,RBAC"; using "Node,
RBAC"[etcd] Creating static Pod manifest for local etcd in "/etc/kubernetes/manifests"
[wait-control-plane] Waiting for the kubelet to boot up the control plane as static Pods from directory "/etc/kubernetes/m
anifests". This can take up to 4m0s[apiclient] All control plane components are healthy after 21.002990 seconds
[upload-config] Storing the configuration used in ConfigMap "kubeadm-config" in the "kube-system" Namespace
[kubelet] Creating a ConfigMap "kubelet-config-1.18" in namespace kube-system with the configuration for the kubelets in t
he cluster[upload-certs] Skipping phase. Please see --upload-certs
[mark-control-plane] Marking the node master as control-plane by adding the label "node-role.kubernetes.io/master=''"
[mark-control-plane] Marking the node master as control-plane by adding the taints [node-role.kubernetes.io/master:NoSched
ule][bootstrap-token] Using token: islm9c.f9rolarxnlnfn4rz
[bootstrap-token] Configuring bootstrap tokens, cluster-info ConfigMap, RBAC Roles
[bootstrap-token] configured RBAC rules to allow Node Bootstrap tokens to get nodes
[bootstrap-token] configured RBAC rules to allow Node Bootstrap tokens to post CSRs in order for nodes to get long term ce
rtificate credentials[bootstrap-token] configured RBAC rules to allow the csrapprover controller automatically approve CSRs from a Node Bootstr
ap Token[bootstrap-token] configured RBAC rules to allow certificate rotation for all node client certificates in the cluster
[bootstrap-token] Creating the "cluster-info" ConfigMap in the "kube-public" namespace
[kubelet-finalize] Updating "/etc/kubernetes/kubelet.conf" to point to a rotatable kubelet client certificate and key
[addons] Applied essential addon: CoreDNS
[addons] Applied essential addon: kube-proxy

Your Kubernetes control-plane has initialized successfully!

To start using your cluster, you need to run the following as a regular user:

  mkdir -p $HOME/.kube
  sudo cp -i /etc/kubernetes/admin.conf $HOME/.kube/config
  sudo chown $(id -u):$(id -g) $HOME/.kube/config

You should now deploy a pod network to the cluster.
Run "kubectl apply -f [podnetwork].yaml" with one of the options listed at:
  https://kubernetes.io/docs/concepts/cluster-administration/addons/

Then you can join any number of worker nodes by running the following on each as root:

kubeadm join 172.168.1.244:6443 --token islm9c.f9rolarxnlnfn4rz \
--discovery-token-ca-cert-hash sha256:41b976bd9e5f8fe1a81d1c3b4dcb33a06dafb0ab3d6de036950ceda1edb4ab6c
记录生成的最后部分内容,此内容需要在其它节点加入Kubernetes集群时执行。
4、根据提示创建kubectl
[root@Master ~]# mkdir -p $HOME/.kube
[root@Master ~]# sudo cp -i /etc/kubernetes/admin.conf $HOME/.kube/config
[root@Master ~]# sudo chown $(id -u):$(id -g) $HOME/.kube/config
5、执行下面命令,使kubectl可以自动补充
[root@Master ~]# source <(kubectl completion bash)
6、查看node节点和pod
[root@Master ~]# kubectl get node
NAME          STATUS           ROLES       AGE          VERSION
master         NotReady        master      6m41s       v1.18.8
[root@Master ~]# kubectl get pod --all-namespaces
NAMESPACE   NAME                                              READY        STATUS       RESTARTS      AGE
kube-system   coredns-7ff77c879f-njmcq              0/1             Pending       0                    6m30s
kube-system   coredns-7ff77c879f-pq5c6              0/1             Pending       0                    6m30s
kube-system   etcd-master                                     1/1             Running       0                    6m39s
kube-system   kube-apiserver-master                    1/1             Running       0                    6m39s
kube-system   kube-controller-manager-master   1/1             Running       0                    6m39s
kube-system   kube-proxy-74j9n                            1/1             Running       0                    6m30s
kube-system   kube-scheduler-master                   1/1             Running       0                    6m39s
node节点为NotReady,因为corednspod没有启动,缺少网络pod
7、安装calico网络
[root@Master ~]# kubectl apply -f https://docs.projectcalico.org/manifests/calico.yaml
configmap/calico-config created
customresourcedefinition.apiextensions.k8s.io/bgpconfigurations.crd.projectcalico.org created
customresourcedefinition.apiextensions.k8s.io/bgppeers.crd.projectcalico.org created
customresourcedefinition.apiextensions.k8s.io/blockaffinities.crd.projectcalico.org created
customresourcedefinition.apiextensions.k8s.io/clusterinformations.crd.projectcalico.org created
customresourcedefinition.apiextensions.k8s.io/felixconfigurations.crd.projectcalico.org created
customresourcedefinition.apiextensions.k8s.io/globalnetworkpolicies.crd.projectcalico.org created
customresourcedefinition.apiextensions.k8s.io/globalnetworksets.crd.projectcalico.org created
customresourcedefinition.apiextensions.k8s.io/hostendpoints.crd.projectcalico.org created
customresourcedefinition.apiextensions.k8s.io/ipamblocks.crd.projectcalico.org created
customresourcedefinition.apiextensions.k8s.io/ipamconfigs.crd.projectcalico.org created
customresourcedefinition.apiextensions.k8s.io/ipamhandles.crd.projectcalico.org created
customresourcedefinition.apiextensions.k8s.io/ippools.crd.projectcalico.org created
customresourcedefinition.apiextensions.k8s.io/kubecontrollersconfigurations.crd.projectcalico.org created
customresourcedefinition.apiextensions.k8s.io/networkpolicies.crd.projectcalico.org created
customresourcedefinition.apiextensions.k8s.io/networksets.crd.projectcalico.org created
clusterrole.rbac.authorization.k8s.io/calico-kube-controllers created
clusterrolebinding.rbac.authorization.k8s.io/calico-kube-controllers created
clusterrole.rbac.authorization.k8s.io/calico-node created
clusterrolebinding.rbac.authorization.k8s.io/calico-node created
daemonset.apps/calico-node created
serviceaccount/calico-node created
deployment.apps/calico-kube-controllers created
serviceaccount/calico-kube-controllers created
8、再次查看pod和node
[root@Master ~]# kubectl get pod --all-namespaces
NAMESPACE   NAME                                                             READY           STATUS      RESTARTS      AGE
kube-system   calico-kube-controllers-5447dc9cbf-sxvxd   1/1                 Running      0                   7m33s
kube-system   calico-node-g2txc                                          1/1                 Running      0                   7m33s
kube-system   coredns-7ff77c879f-njmcq                            1/1                 Running       0                   14m
kube-system   coredns-7ff77c879f-pq5c6                            1/1                 Running       0                   14m
kube-system   etcd-master                                                   1/1                 Running       0                    14m
kube-system   kube-apiserver-master                                  1/1                 Running       0                    14m
kube-system   kube-controller-manager-master                 1/1                 Running       0                    14m
kube-system   kube-proxy-74j9n                                         1/1                  Running       0                    14m
kube-system   kube-scheduler-master                                 1/1                 Running       0                    14m
[root@Master ~]# kubectl get node
NAME        STATUS       ROLES         AGE        VERSION
master       Ready          master        15m         v1.18.8
# 此时集群状态正常
9、安装kubernetes-dashboard
官方部署dashboard的服务没使用nodeport,将yaml文件下载到本地,在service里添加nodeport
[root@Master ~]# wget https://raw.githubusercontent.com/kubernetes/dashboard/v2.0.0-rc7/aio/deploy/recommended.yaml
添加nodeport
[root@Master ~]# cat recommended.yaml
kind: Service
apiVersion: v1
metadata:
  labels:
    k8s-app: kubernetes-dashboard
  name: kubernetes-dashboard
  namespace: kubernetes-dashboard
  type: NodePort
  ports:
    - port: 443
      targetPort: 8443
      nodePort: 30000
  selector:
    k8s-app: kubernetes-dashboard
或者直接下载备用地址(因为官方我下载不了,我上传到我的服务器了,下载直接使用,不需要添加nodeport端口)
[root@Master ~]# wget https://mirrors.yangxingzhen.com/kubernetes/recommended.yaml
[root@Master ~]# kubectl create -f recommended.yaml
namespace/kubernetes-dashboard created
serviceaccount/kubernetes-dashboard created
service/kubernetes-dashboard created
secret/kubernetes-dashboard-certs created
secret/kubernetes-dashboard-csrf created
secret/kubernetes-dashboard-key-holder created
configmap/kubernetes-dashboard-settings created
role.rbac.authorization.k8s.io/kubernetes-dashboard created
clusterrole.rbac.authorization.k8s.io/kubernetes-dashboard created
rolebinding.rbac.authorization.k8s.io/kubernetes-dashboard created
clusterrolebinding.rbac.authorization.k8s.io/kubernetes-dashboard created
deployment.apps/kubernetes-dashboard created
service/dashboard-metrics-scraper created
deployment.apps/dashboard-metrics-scraper created
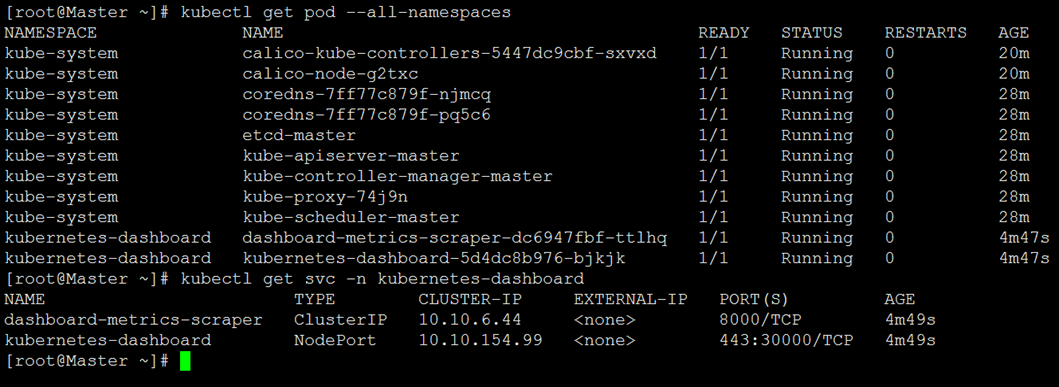
10、查看pod和service
[root@Master ~]# kubectl get pod --all-namespaces
[root@Master ~]# kubectl get svc -n kubernetes-dashboard
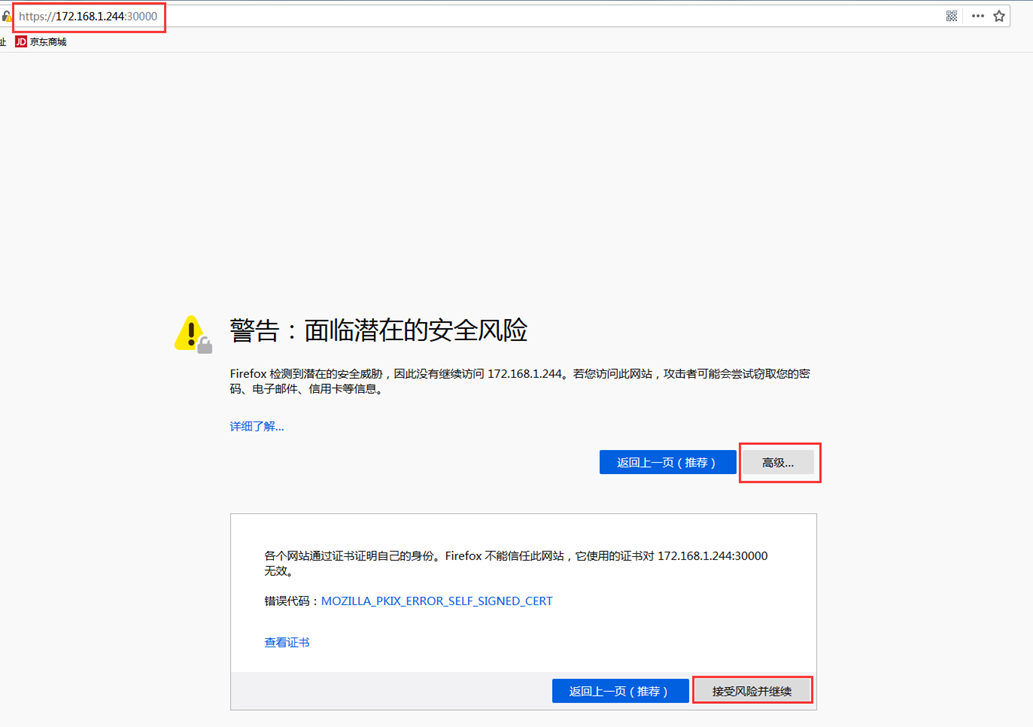
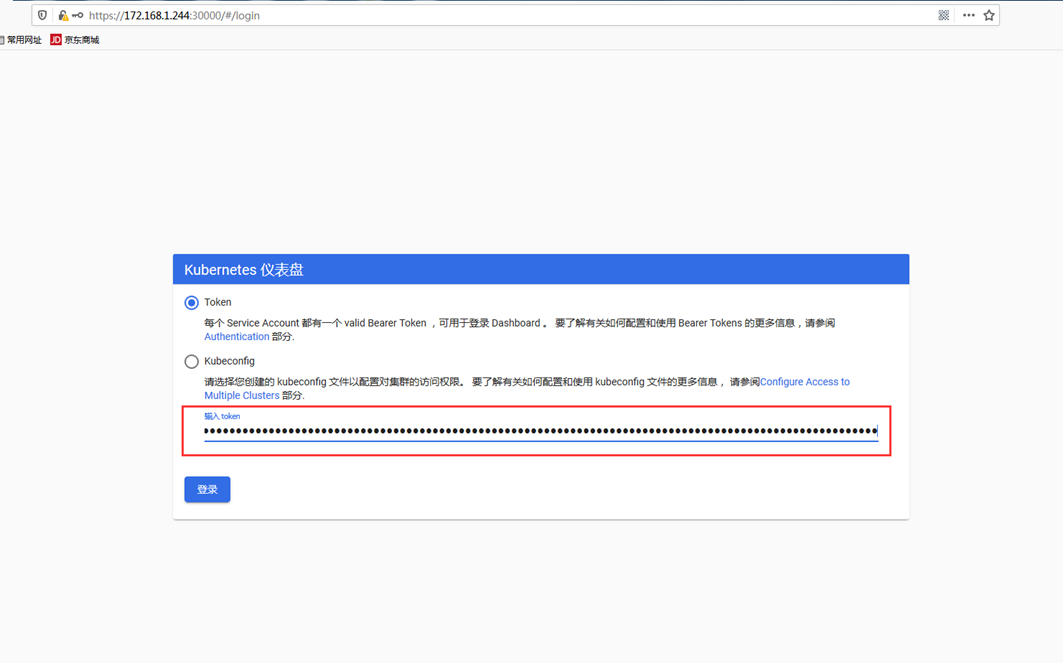
11、通过页面访问,推荐使用firefox浏览器
# 浏览器输入https://172.168.1.244:30000,如下图
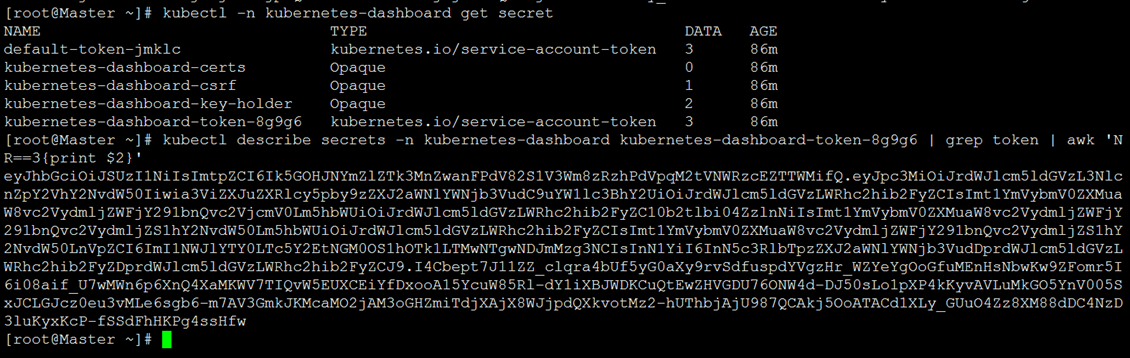
1)查看凭证
[root@Master ~]# kubectl -n kubernetes-dashboard get secret
2)使用token进行登录,执行下面命令获取token
[root@Master ~]# kubectl describe secrets -n kubernetes-dashboard kubernetes-dashboard-token-8g9g6 | grep token | awk 'NR==3{print $2}'
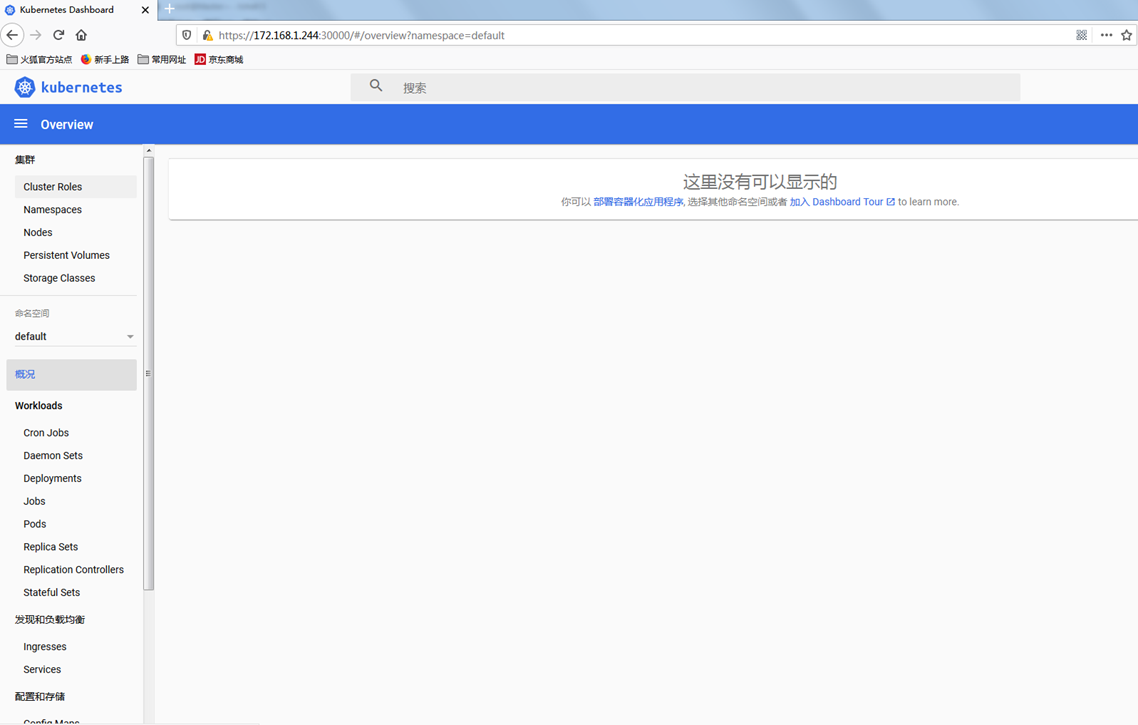
3)登录后如下展示,如果没有namespace可选,并且提示找不到资源 ,那么就是权限问题
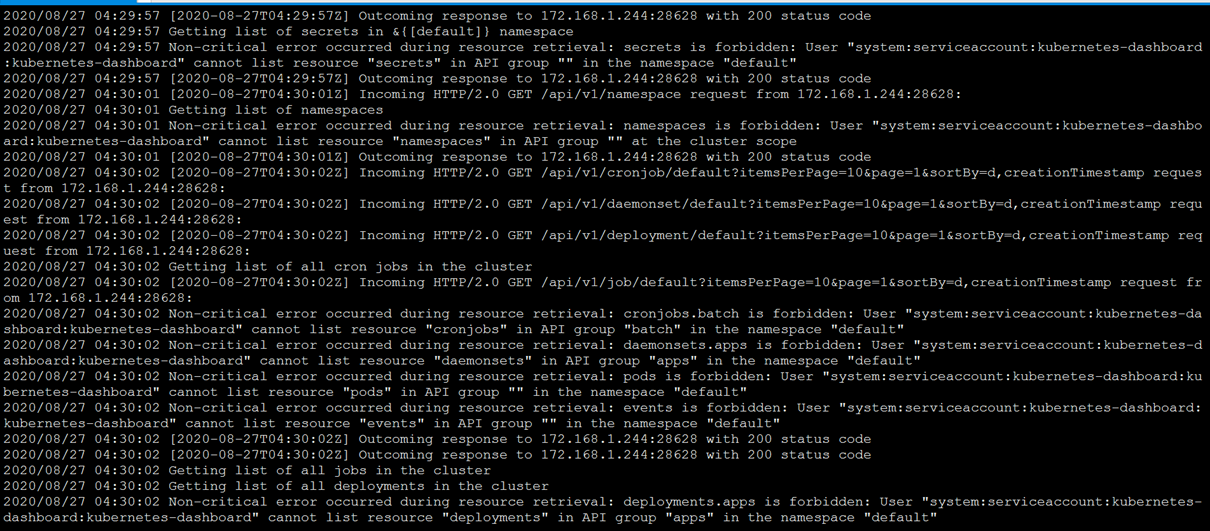
12、通过查看dashboard日志,得到如下信息
[root@Master ~]# kubectl logs -f -n kubernetes-dashboard kubernetes-dashboard-5d4dc8b976-bjkjk
解决方法
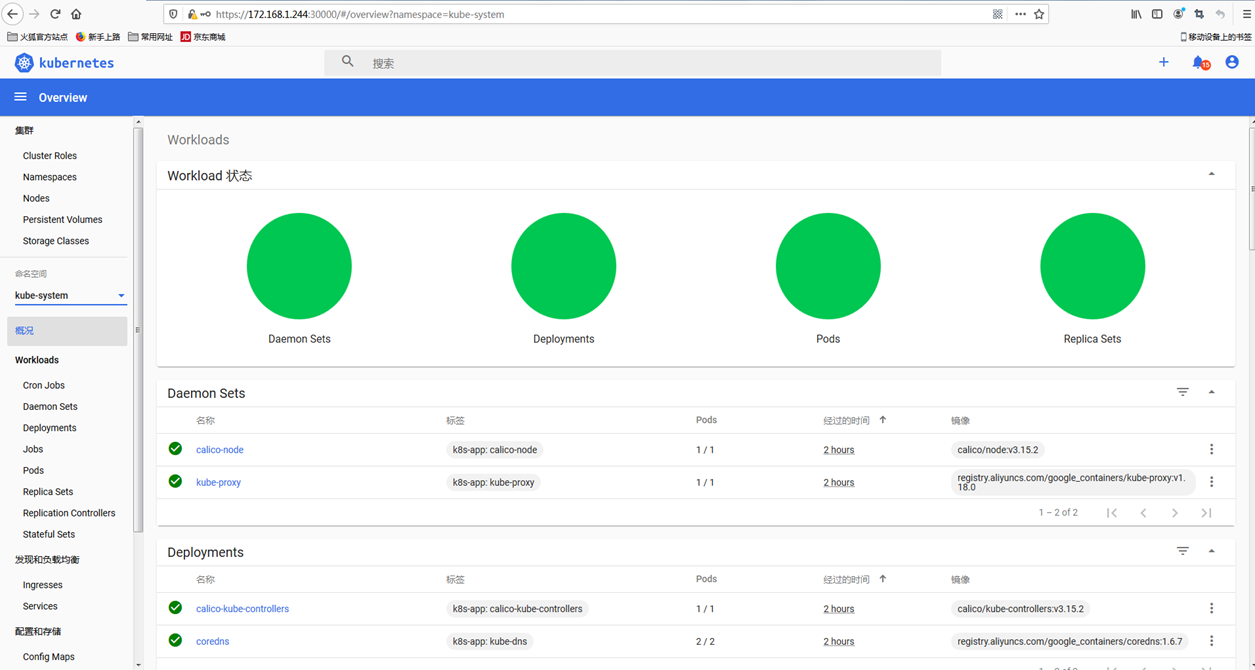
[root@Master ~]# kubectl create clusterrolebinding serviceaccount-cluster-admin --clusterrole=cluster-admin --user=system:serviceaccount:kubernetes-dashboard:kubernetes-dashboard
此时再查看dashboard,即可看到有资源展示
至此,kubeadm在CentOS 7上部署kubernetes1.18完毕。
若文章图片、下载链接等信息出错,请在评论区留言反馈,博主将第一时间更新!如本文“对您有用”,欢迎随意打赏,谢谢!


评论